Translate

Monday, October 19, 2015

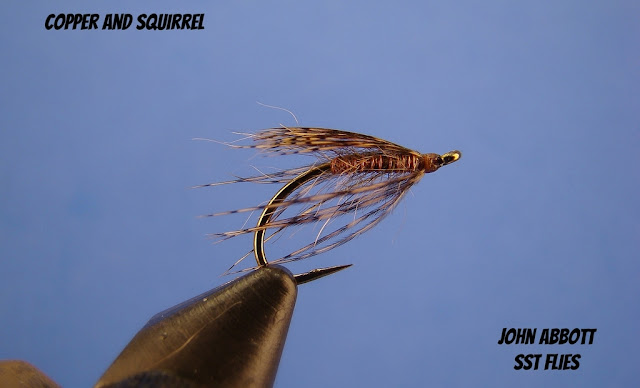
Copper and Squirrel - A Winged Soft Hackle

No comments:
Some of my contemporaries have asked about the spey-ish look and style of the Copper and Squirrel. Admittedly, this fly was not designed with this in mind. Rather I was seeking a real solid emerger pattern utilizing one feather for a wing and hackle   However, I may be on to something....  A micro-spey for trout?

The body is made entirely of copper wire and squirrel underfur with a few longer guard hairs left in the mix.  To achieve the "loose dubbing" effect, a very tacky wax is applied to the copper wire and the fur is pressed (not twisted) on to the wire then wrapped in the normal way.  

You'll find a lightly dressed fly with a lot of copper showing through fishes the best as body weight and dressing allows for a deeper presentation in the water column.  As the fly nears the end of the drift, tension from the current raises the fly towards the surface.  It is at this point you can expect quick, jerky strikes!

Materials

Hook:  Daiichi 1150, size 10-16
Thread:  10/0 or 8/0
Body:  Copper wire, fine.  The darker the better!  Fox squirrel with most of the guard hairs removed.
Wing/Hackle:  Brown partridge

Step 1:

Pinch barb with vise.  Secure hook.  Apply wax to the first two inches of copper wire.  Wind copper wire rearward stopping between the hook point and barb.


Step 1a:

Remove tag end by wiggling back and forth.


Step 2:

Apply a tacky wax to the copper wire and press dubbing on to it.  Wind forward.  The end result should look similar to picture below.


Step 3:

Start thread with a couple of wraps in front of the copper wire.  Take one or two turns of copper wire and then secure with tight thread wraps.


Step 3a:

Wiggle wire back and forth to remove.


Step 4:

Prepare partridge feather by removing fluff and one side of the fibers.  Measure hackle tip by placing the tip at the thread's tie in point (near hook eye) and visually note the distance to the hook bend. This area (further down the stem) will be the tie in point.  Tie in with the hackle tip extending over the eye utilizing two or three tight wraps.  Draw hackle tip back over the thread wraps and take a couple of securing wraps.  This will lock the feather in place.  The stem of the partridge feather should be centerline over the hook shank.  Note the length of the wing.


Step 4a:

Take one or two wraps of hackle and secure.  Whip finish and apply a coat or two of head cement.


Enjoy!

Sunday, October 18, 2015

Hare's Ear Soft Hackle (Egg Layer)

No comments:

Egg layer, hot butt, bright spot, flaming arse, hemorrhoid... I've heard a lot of different names for a tag of florescent thread, but doesn't egg layer sound much more appetizing?


The combination of hare's ear, chartreuse and gray partridge has been responsible for countless trout over the years.  In fact, I feel this version flat out fishes the standard hare's ear by leaps and bounds simply due to the tag.  Anytime caddis are on the water is a great time to fish this soft hackle.

Materials

Hook:  Daiichi 1150 or TMC 2499SPBL, sizes 10-16
Thread: 8/0 tan or brown
Tag:  UTC 70, chartreuse
Ribbing:  Lagartun, small oval gold
Body:   Hare's ear, matural
Hackle:  Partridge, gray

Step 1:

Pinch barb with vise.  Place hook in vise as shown.


Step 2:

Build the tag with even layers of chartreuse thread.  Advanced thread forward and whip finish.  If desired, coat the tag with head cement for durability.  You may consider preparing a few hooks in advance to save a lot of time.


Step 3:

Switch thread to brown.  Tie in ribbing and make firm secure wraps to position shown.


Step 4:

Dub a tapered body of hare's ear.  Do not crowd the eye.


Step 5:

Wind ribbing forward in even segments and secure.


Step 6:

Prepare partridge feather by removing all fluff and fibers from on side as shown.


Step 7:

Take one to three wraps of partridge and secure.  Whip finish and apply one or two coats of head cement.


Enjoy!

Saturday, October 17, 2015

Black Gold Soft Hackle

No comments:
Do you have waters that you fish where carrying nondescript or generic flies are a prerequisite?  I can think of a few waters where the fish take these flies with wreckless abandonment even though there's plenty of bugs to keep them fat, dumb, and happy.

Give this soft hackle a shot!

Materials

Hook:  Daiichi 1150 (or TMC 2499SPBL), sizes 10-16
Beads:  Transparent gold with gold lining.  Size is dependent upon hook.
Thread:  8/0 black
Tail:  Black hen 
Rib:  Fine gold
Body:  Thread
Thorax:  Two gold glass beads and Ice Dubbing, peacock black
Hackle:  Black hen

Step 1:

Pinch barb with vise.  Place beads on hook.  Secure hook and start thread just forward of the hook point.


Step 2:

Select 4 to 6 hen hackle fibers.  Align tips by drawing them 90-degrees from the stem and remove. Tie in to the top of the hook shank and take a few flat turns of thread. Tail length is approximately one hook gap.


Step 2a:

Tie in ribbing with flat wraps of thread and advance thread to position shown.


Step 3:

Build a tapered thread body.  Keep body thin.  Check is see if rear bead will hold firmly in place by pushing it back over thread wraps.


Step 4:

Wind ribbing forward in even segments.  Check rear bead again.  If the bead fits snug, make a two or three turn whip finish and move beads back towards the eye.  Rear edge of bead should be inline with hook point.  (Doesn't need to be perfect.)


Step 5:

Apply a very small drop of super glue to the area the beads will rest.  Maneuver beads in to place.


Step 6:

Reattach thread forward of the beads.


Step 7:

Dub a small amount of Ice Dubbing and pick out.


Step 8:

Prep hen feather by removing one side of the fibers.  Tie in by the tip.


Step 8a:

Take 1 to 3 three wraps, secure and whip finish.  Apply one or two coats of head cement.


Enjoy!

Friday, October 16, 2015

Filoplume Soft Hackle

3 comments:
When I was tying dozens of flies each week for my mail order business through the early 1990's, soft hackles were already popular with the customers.  Once filoplume (or after shaft) feathers were beginning to be used with regular frequency by tiers I copied and added them as a thorax.  Sales took off!

Filoplume is a very underutilized material, perhaps due to it's inherently weak stem, but with the proper tying preparations, this feather adds an extra degree of effectiveness to an already deadly pattern! 

Thread, floss or dubbing in various colors can cover just about any natural insect.  However, my favorites are tied with florescent colors of UTC 70 thread.  Have fun and experiment!

Materials

Hook:  Daiichi 1150 (or TMC 2499SPBL), sizes 10-16
Thread:  UTC 70, color of choice
Body:  Thread  (Chartreuse pictured)
Thorax:  Partridge filoplume
Hackle:  Partridge, gray.

Step 1:

Pinch barb with vise.  Secure hook and start thread one eye length behind the eye and make a few wraps and remove tag end.   We will be building the body with wraps of thread.  Try to keep each wrap flat, floss-like for aesthetic purposes.


Step 2:

Build a taper utilizing thread stopping at the thorax.  A drop of thin head cement may be added to the rear thread wraps if desired.


Step 3:

The best filoplume comes from rump section.  Select a feather with filoplume attached (pictured to the bottom right of the larger feather).  Cut away the tip of the butt section. 


Step 3a:

Split thread and insert filoplume butt (thicker) section up, towards hook.  Keep the stem centred along the thread.


Step 3b:

Spin thread to lock filoplume.


Step 3c:

Moisten fingers and draw fibers rearward and begin wrapping in the thorax.  Do not crowd the eye.


Step 4:

Tie in gray partridge feather by the tip.


Step 4a:

Make one or two wraps.  Secure, whip finish and apply a coat or two of head cement.  Finished!


Enjoy!

Thursday, October 15, 2015

Blood Trail - Soft Hackle

No comments:
Materials

Hook:  Daiichi 1150, sizes 10-16
Thread:  8/0 brown
Rib:  Lagartun, gold, small oval
Body:  Fox squirrel
Throrax:  50/50 Fox squirrel and Red Ice Dubbing
Hackle:  India hen, mottled brown


Step 1:

Pinch barb with vise.  Secure hook and start thread in position shown.  Make a few even wraps rearward.


Step 2:

Tie in ribbing and make securing wraps to the bend of the hook.


Step 3:

Dub a tapered body of fox squirrel.


Step 4:

Wind ribbing forward in equal segments and secure.


Step 5:

Dub thorax consisting of a 50/50 mixture of fox squirrel and red Ice Dubbing.


Step 5a:

Pick out dubbing.


Step 6:

Prepare hen hackle by removing one side of fibers.  Tie in by the butt end as shown.


Step 6a:

Make two or three wraps of hen feather.  Secure, whip finish and apply a coat or two of head cement


Enjoy!

Tuesday, October 13, 2015

JAB's Reversed Soft Hackle - Breaking Tradition

No comments:
"Reversed soft hackle?  Ah, come on, that's a tenkara fly..." you say.   

The inspiration for reversing the hackle was derived from renowned Pacific Northwest angler Mike Kinney's killer searun cutthrout fly the Reversed Spider.  For over 40-years, the Reversed Spider has taken numerous anadromous species along the west coast in both fresh and saltwater- long before the popularity of tenkara in the United States.  

I can assure you this style of fly moves in the water like nothing you've ever seen!  When the fly is twitched or drawn tight to the current, the hackle flows back over the body and wants to naturally return forward of the eye in the resting position.  This pulsating action perfectly mimics an emerging or crippled insect; which, possibly explains the phenomenal success of this style of tying.  If you incorporate different retrieves, twitching or lifting techniques in the swing I can guarantee fish!

Materials

Hook:  TMC 2499SPBL or Daiichi 1150, sizes 10-16
Thread:  8/0 Uni-thread, brown
Hackle:  Mottled hen
Rib:  Lagartun, gold, small oval
Body:  Ice Dubbing, olive brown

Step 1:

Secure hook in vise.  Start thread immediately behind the eye and take a few wraps.


Step 2:

Secure hen feather with the butt end forward of the eye and concave side down as shown.


Step 2a:

Lift feather straight up.  Stroke fibers forward over the eye.  I find that moistening my fingers with water makes the task much easier.


Step 2b:

Take 1 to 3 wraps of hackle to the rear in close touching intervals.   This is how "reverse hackling" gets its name.


Step 3:

Tie in ribbing and advance thread to the rear of the hook to position shown.


Step 4:

Apply dubbing to thread and wrap forward forming a tapered body. Leave a small amount of room behind hackle to secure ribbing/thread.


Step 5:

Wrap ribbing forward in even segments and secure.  Don't worry about this step looking pretty. We'll cover with a whip finish of dubbing!


Step 6:

Apply a very small amount of dubbing to thread and slide dubbing up to body.  With dubbing on the thread, whip finish.  This will hide the thread!  No need to worry about neatness here either... Let's pick the dubbing out!

Can you visualize an emerging or crippled caddis in the surface film?  


Enjoy!