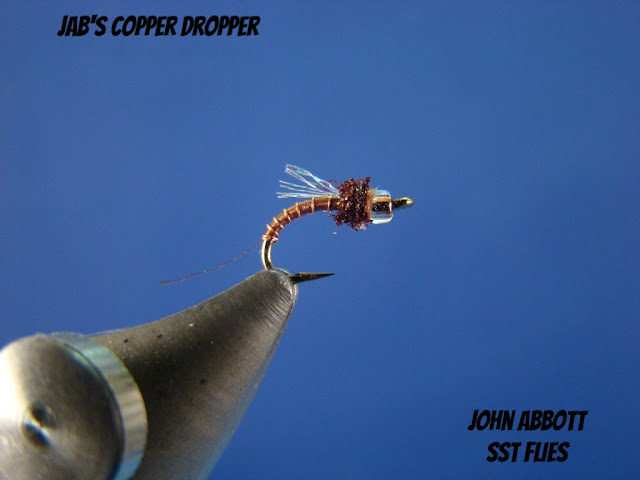
My Copper Dropper has undergone quite a few changes over the past of couple years. It has always been an effective midge emerger pattern, but I was never satisfied with the look of the materials in and out of the water. However, the current line up of materials has really boosted my confidence. Let's take a look what's different.
The first change was replacing the metal coper bead with a transparent glass bead with a copper lining. Glass beads have an entirely different light refraction underwater compared to a metal beads. Now couple this with getting away from the standard copper or gold bead that seemed to be tied on every other anglers tippet... Next, as much as I love natural peacock, I switched it out for a dark synthetic peacock dubbing. The shuck of Z-lon or Antron was just fine however, I been playing around with a newer material called Body Quill. This transparent mylar comes in quite a few colors and usually can be color matched with the body color. It's pretty hard to tear, but as a shuck, the best attribute is it's movement in the water! Finally, I am still playing around with different winging materials, but Glitter Thread is hard to beat right now.
I received a request asking if I could start posting a picture of the materials I use for each fly. What a wonderful idea!
Materials:
Hook: Daiichi 1150 size 18
Bead: 15/0 Japanese glass Tohu transparent/copper lining
Thread: UTC70 Rusty Brown
Ribbing: Extra fine copper (Hends .009 is pictured)
Shuck: Veevus Body Quill, Brown
Wing: Glitter Thread, White (Pearl)
Thorax: Hends Spectra Dubbing, Dark Copper Peacock (#435)
Step 1:
Flatten barb with vise jaws and add 15/0 bead to hook. To build a smooth taper to the body of the fly start thread at the middle of the hook shank. Instead of crossing the thread initially, wind thread forward to the bead. Keep the thread as flat as possible.
Step 1A:
Wind thread back over initial wraps and proceed to approximately the three quarter mark on the shank. Remove tag end.
Wind thread back over initial wraps and proceed to approximately the three quarter mark on the shank. Remove tag end.
Step 2B:
Return thread to the bead. Remember to keep the thread flat.
Return thread to the bead. Remember to keep the thread flat.
Step 3:
Remove 2 or 3 inches of copper wire from the spool. Secure ribbing without taking one wrap of thread. Simply bring the material under the hook slightly touching the thread then move up and away from you. Both hands should be on the far side of the vise. Now lift straight up. The ribbing should be under the last turn of thread. Repeat this process two more times. Ensure ribbing is parallel with hook shank.
Remove 2 or 3 inches of copper wire from the spool. Secure ribbing without taking one wrap of thread. Simply bring the material under the hook slightly touching the thread then move up and away from you. Both hands should be on the far side of the vise. Now lift straight up. The ribbing should be under the last turn of thread. Repeat this process two more times. Ensure ribbing is parallel with hook shank.
Step 4:
Repeat step 3 with "quill" material. Take just one turn under the thread wraps and one turn of thread over the top.
Step 5:
Wind thread to the rear well into the bend of the hook and return to bead. Ensure ribbing is tied parallel to the hook shank and "quill" material remains on top. Remove waste ends.
Step 5A:
Step 5A:
Wind ribbing forward. The first two turns are immediately taken behind the thread body The next two turns are close together and then opened in distance to the bead area (as pictured). Remove waste end at the bead. Note smooth transitional taper of the body.
Step 6:
Remove 2 to 3 inches of Glitter Thread from the spool Unravel one end. You should notice 5 micro fibers and a single strand of pearl mylar. Remove two strands of micro fibers and secure to the top of the hook shank.
Step 6B:
Fold the forward materials back over the hook shank and secure.
Step 6C:
Cut wing to approximately the 3/4 mark of the hook shank.
Step 7:
Dub a small proportionate thorax. Whip finish. Trim shuck to approximately one hook shank in length.
Enjoy!


No comments:
Post a Comment