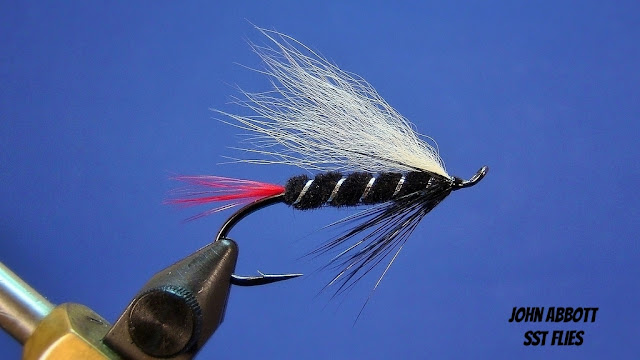
Ready to get started on tying some salmon and steelhead patterns?
It took me a few days to decide on how best to proceed with this genre of flies as most tiers will want to immediately start with all the latest and greatest fish catchers, i.e., intruder styles. However, there are many tying techniques which will be extremely helpful to you (for other patterns as well) as I build up to the fancy stuff.
I'll keep things as simple as possible for the first few flies. Let's tie the ever popular Skunk to start things off. With these few steps there are dozen of classic patterns you can tie!
Materials:
Thread: Black (10/0 pictured)
Hook: Gamakatsu T10-6H (Size 4 pictured)
Tail: Red saddle hackle fibers
Ribbing: Lagartun, silver
Body: Vernille or chenille, black
Hackle: Black saddle hackle
Wing: Bucktail, arctic fox, skunk, etc., white
Materials:
Thread: Black (10/0 pictured)
Hook: Gamakatsu T10-6H (Size 4 pictured)
Tail: Red saddle hackle fibers
Ribbing: Lagartun, silver
Body: Vernille or chenille, black
Hackle: Black saddle hackle
Wing: Bucktail, arctic fox, skunk, etc., white
Step 1:
Place hook in vice. Start thread approximately one eye length behind the eye making tight even turns rearward securing the wire loop.
You've probably notice on all the patterns tied for the blog having a specific thread starting point. My starting points are measurements (or stopping points) for finishing each pattern.
Top view
Continue to advance thread to the hook point.
Step 2:
Select a red saddle hackle. I prefer the softer, web-like fibers near the bottom of the stem. Align approximately 12 to 15 fiber tips by stroking the fibers 90-degrees from the stem. Pinch the tips and remove with a quick downward plucking movement.
Measure tail. The length is approximately one hook gap. Tie in directly to the top of the hook and make a few rearward wraps, Stopping position is pictured. The proportions for the body on this style of hook is mid way between the hook point and barb. Since I am tying with vernille, a thick, dense chenille material, I am anticipating this width by stopping the thread early.
Step 2B:
Remove the butt ends of the hackle by cutting parallel to the shank. This will create a taper and avoid build up in this area.
Step 3:
Flatten thread and make a sharp turn forward over previous thread wraps. Again, we don't want a bunch of thread build up in this area. Tie in tinsel with a few rearward wraps of thread on the opposite side of hook at the 4 o'clock position on the shank. I have stopped at the hook point as pictured.
Step 4:
Strip approximately a half inch of vernille from the core.
Step 4A:
Tie in and secure vernille to the top of the shank and advance thread forward to the return loop area.
Step 4B:
Wrap vernille forward in close, tight wraps to the starting point marked by the thread behind the eye (Step 1). Next, peel back a section of vernille as pictured. This is keep thread wraps to a minimum and reduce bulk.
Step 6:
Select a black saddle hackle. The length of the fibers can reach anywhere from 1/2 to full body length. Most tiers will strive to have the fibers reach the hook point or slightly shorter.
Tie in saddle hackle by the tip end and remove cut away tip section.
Step 6B:
Lift hackle straight up and stroke fibers rearward. With fibers coaxed to the rear take 3 or 4 turns while ensuring fibers lay to the rear during the turns This can be done with continued fiber management (stroking while wrapping).
Step 6C (Optional):
Many pattern books call for the hackle to be positioned "down and back." This is nothing more than equally splitting the hackle from the top of the shank and drawing them in a downward fashion. This is done to keep the wing from positioning or riding too high over the body.
Step 7:
Remove a small bunch of hair from the hide. The original was tied with bucktail and later with polar bear hair. Arctic fox. temple dog or skunk hair are an excellent substitutes. I am tying with skunk due to it's thin, soft and translucent fibers (akin to polar bear).
Step 7A:
Thin and hand even hair tips by pinching and pulling the larger guard hairs away. Also remove some of the underfur as well as shorter hairs from the sides of the clump. Save your longer guard hairs in a pile with the tips to one side. This pile can be hot glued once the butt ends are trimmed and used for additional flies.
Step 7B:
Switch the clump to the opposite hand, Measure the wing by placing the hair over the top of the body. The wing should be to the bend or slightly past.
Step 7C:
With the length measured, switch the clump to the other hand and use the thread's position as a cutting guide.
Step 7D:
Your clump can now be move away from the top of the shank to clean up the butt ends if needed. If not, move hair into position, lift and angle hair to a 30 to 45 degree angle to the body. This will trap the top of the butt ends to the shank. Make a a few tight securing turns. Once secured, I like to add a small drop of thin head cement to help lock in the butt ends.
Step 7E:
If you elected to add a drop of head cement to the butt ends, allow it to sink in. Take a few extra tight wraps and then complete with a 3 or 4 turn whip finish and cut away thread. Add a coat or two of head cement to achieve desired gloss.
Enjoy!


No comments:
Post a Comment