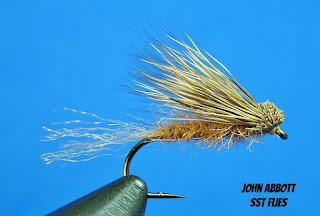
Craig Mathews and John Juracek are credited with this outstanding pattern which imitates a crippled or emerging caddis. "How can such a simple pattern can be so darn effective?" you ask. It rests solely with the design.
I'll share some creative ways to tie variations of this pattern:
The original is tied with beaver fur for the body, but synthetics are the rule of thumb today with fine Antron leading the way. However, you might consider CDC, wrapping ostrich, goose biots, stripped quills or peacock herl. I recently spoke with an angler that wraps gold mylar tinsel for the body.
The shuck can be tied three ways. The original is a straight cut left behind the hook (as demonstrated in this step-by-step). However, tying the shuck twice the length and then doubling back to create a loop seems to be taking off. The thought here is better representation of the natural's air bubble. Finally, the shuck material is doubled and tied slightly longer before spitting the amount in half. One portion is cut for the tail and other half is very loosely brought back over the body and secured before the last wrap or two of dubbing- similar to LaFontaine's Sparkle Caddis'.
The X-Caddis makes my personal list of mandatory patterns to carry!
Materials
Hook: Daiichi 1180 (pictured) or dry fly hook of choice, sizes 10-20
Thread: 6/0 color to match
Shuck: Z-lon or Waspi's sparkle yarn (sparkle yarn pictured)
Body: Synthetic to match natural (I like finely chopped STS Trilobal dubbing)
Wing: Natural deer or elk hair
Step 1:
Pinch barb with vise. Secure hook.
Step 2:
Start thread about one eye length behind the eye of the hook.
Approximately half way down the shank tie in and secure sparkle yarn. Stopping point is directly inline with the barb
Cut shuck to equal approximately one body length. Error on the side of shorter if necessary
Step 3:
Apply dubbing to the thread.
Wind and taper dubbing forward to the position noted. Take a few turns of thread on bare shank. This will be a base for the deer hair.
Step 4:
Cut deer hair from the patch. Comb out all under fur and short hairs. Place hairs in a stacker to align the tips. Once removed from the stacker, check for any broken tips and remove. Next, measure the tips to the bend of the hook. With the opposite hand and medium pressure, pinch hair to the top of the shank. Make two soft loops/wraps of threads at the tie in spot and apply pressure by lifting the bobbon straight up flaring the hair. Take another two wraps of thread using solid pressure and then weave the thread through the butt ends to the eye.
Apply head cement to the first inch of thread. Pull all hair back over the fly and whip finish. In my opinion tying in the deer (above) and securing as shown below yields the best looks heads/results.
Separate the butts from the wing hairs. Trim to shape. Nothing like a fish slapping a bug on the surface!
To maximize the effectiveness of the X-Caddis the body should dip just below the surface like a natural cripple or emerger. Therefore, only apply floatant to the wing.
Enjoy!


No comments:
Post a Comment