Translate

Saturday, September 29, 2018

Hatching Foam Wing Emerger - #29 of 150

1 comment:
I am sure, at one time or another, most of use have used a version of the Foam Wing Emerger.  The only differnces between the Foam Wing Emerger and the Hatching Foam Wing Emerger is the latter uses fine rabbit tied loosely for a thorax.  This allows the pattern to breath extremely well imitating movement and emergence from the shuck in softer currents such as flats and tailouts.  It also an effective lake pattern when there's slight ripple across the surface.

My personal choice of winging material is packing foam with the larger closed cells.  These larger cells aid tremendously in floatation and add light refraction qualities.  Finally, with my old eyes, I like a little larger wing strictly for visibility and keep my casts short so I can follow the fly in the bubble line.

Materials:

Hook:  Any light wire curved shank (Daiichi 1140, size 20 pictured)
Thread:  14/0 Veevus, gray
Ribbing:  14/0 Veevus, black
Body:  Thread.  Uncord the thread so it wraps flat.
Wing:  Close cell packing foam
Thorax:  Gray rabbit.  Use the finest of under fur in the package.


Closed Cell Foam Fly Tying, Veevus Threads, Rabbit Dubbing, Midger Emerger, Midge Patterns, Daiichi Hooks

Friday, September 28, 2018

Matt's Gnat - #28 of 150

No comments:
Matt Grobert's efforts at coming up with a more durable version of a Griffith's Gnat hit double bullseye.  He calls it simply:  Matt's Gnat.  The pattern has been around 25 or so years and gained a following after the pattern was publish in Fly Fisherman Magazine around the time of it's inception.  

This pattern is a fairly simple tie to master.  Unlike the Griffith's Gnat that utilizes hackle and gold wire to secure everything in place, Grobert simplifies his eponymous fly with snowshoe rabbit and a single strand of peacock herl in a dubbing loop.  The result is a very buggy pattern that floats like a cork.  Not to mention it catches a lot of "sippers" in the surface film.  So if you are ensure of the hatch (midges or mayflies) and see small dimples on the water tie one of these bad boys on!

Someone once asked me, "Between the Griffith's Gnat or a Matt's Gnat what do you find more effective?"   The answer, "That's a tough choice, but the buggiest and transluceny of the Matt's Gnat gets my vote."

Tying Instructions:

1.  Pinch barb of a TMC 2488 utilizing the jaws of the vise.
2.  Secure thread approximately one eye length behind the eye and wrap to the center of the shank.
3. Tie in one single strand of peacock herl and secure with wrap rearward to a point just above the barb and return thread forward.  The juiciest herl is found on a "stick" just below the eye.
4.  Use a very tacky wax and apply liberally to the thread.
5.  Utilize the hairs from the bottom of a snowshoe rabbit.  Clip away from foot and remove all guard hairs.  I like the softest and thinnest hairs.  Touch dub the hair at a 90-degree angle to thread.  Ensure the hair is not too long..   Now form a dubbing loop and secure the loop with wraps of thread rearward.  Insert the peacock hair into the dubbing loop.  Twist the combination to form a chenille-like appearance and wind forward to a position just behind the eye.  The body will be  plump and the hair will stick out at angles- just like hackle.
6.  Secure dubbing loop, remove waste and whip finish.

Materials:

Hook:  TMC 2488, sizes 16-24 (Size 20 pictured)
Thread:  14/0 Veevus, red (Grobert uses 6/0 UTC)
Body:  Peacock herl single strand and natural color snowshoe rabbit wound in a dubbing loop


Matt's Gnat, Midge Pattern, Midge Emerger, Adult Midge, TMC Hooks, Peacock Herl, Snowshow Rabbitt


Thursday, September 27, 2018

Ginny Midge - #27 of 150

No comments:
I believe the orginator of this exceptional pattern is Eric Atha.   If any of you blog readers know for sure drop me a comment below.

Notes:

(1)  This is a great pattern when swarms of midges are coming off the water!
(2)  Imagine the variations of this very simply pattern,  The original is tied with a single strand of pearl Flashbou, but any flat mylar tinsel should be productive.
(3)  The wing is formed after the body is wrapped and secured.  Then make two or three twists and secure to the top of the hook
(4)  I have replaced the Flashabou with a sewing product called Sulky.  This stuff is much stronger and doesn't stretch nearly as much as Flashabou.

Materials:

Hook:  TMC 2488 sizes 18 -24 (or similar curve nymph hook)
Bead:  15/0 Gray silver lined glass, Tohu Japanese
Thread:  Black, choice of denier.  (Veevus 14/0 pictured)
Body/Wing:  Sulky, Holographic Pearl

Ginny Midge, Sulky, Midge Pattern, Midge Emerger

Wednesday, September 26, 2018

Tora Midge - #26 of 150

No comments:
Here is one of my secret patterns and it is time to let the cat out of the bag  Maybe I should say... tiger instead.

"Tora" translates to "tiger" in Japanese and the stripped peacock herl dyed in various colors lends itself well to mimicing the stripes of a tiger.

Pictured below is my ginger version.  The body presents a well segmented look, transparent tan shuck and a breathable wing to the fish   I generally fish the Tora as my top dropper in a 3-fly rig.  If I am positive fish are keying in on midges I'll tie it on as my last fly in the series.  In this position I will prolong the drift covering more water and allow the pattern to rise at the end of the swing.

Tying Notes:

1.  Nano Silk in 18/0 ensuress the body remains thin.  
2.  Once the body was been wrapped apply a light coat of UV resign
3.  The fluff at the bottom of a feather makes for a wonderful wing.  You'll want to get a pretty sizeable bunch together and try to use the portion closest to the stem.  To get the wing length pinch/pull the ends until even then wet the winging material.  Make a couple of securing wraps and draw feather to length.  Cut/Remove the waste end from over the eye..  The wing should be a little longer than normal on smaller sizes hooks.  This will allow the fluff to move in the water.  Too short of a wing will deaden the movement and lessen the effectiviness of the pattern

Materials:

Hook:  TMC 2488 or 2488H, sizes 18-22 (pictured is size 20)
Thread:  18/0 Nano Silk, copper 
Shuck:  Hends Body Quil, tan
Body:  Polish Quills, dyed ginger (Coat body with a thin UV resin and cure)
Wing:  Fluff of the bottom of a partridge or grouse feather.  (Not filoplume)
Thorax:  Super Fine Dubbing, brown


Tora Midge, Midge Emerger, Putah Creek, Body Quill, Stripped Peacock Herl, Partridge Feather. Super Fine Dubbing, TMC Hook, SST Flies, Midge Pattern

Tuesday, September 25, 2018

Neon Nightmare - #25 of 150

No comments:
Matt McCannel, guide and Umpqua Signature Fly Designer, is the creative mind behind the Neon Nightmare.  The pattern is tied in fluorescent pink or fluorescent orange which allow these two colors really standout and penetrate the massive midge hatches of Colorado.   I have personally found the Neon Nightmare (in fl. orange) to be quite effective in the higher elevations of the Sierras for both rainbow and brook trout.

Tying Notes:

1.  Having two bobbins ready, one with white and the other for the color of choice of ribbing and thorax/head, will speed the process up significantly.
2.  I believe 70 denier Uni-thread is the standard thread used, but I find thread control much easier with 12/0 or 14/0 threads.   It is hard to beat the vivid colors in the Veevus line up.
3.  5-minute epoxy is use to coat the fly, but UV resin is much easier and quicker to work with.  If you decide to use epoxy do all the flies at the same time.
4.  The thorax/head is a continuation of the ribbing.  There is no need to cut the thread from the ribbing to finish the pattern.

Materials:

Hook:  TMC 2488 or 2488H, sizes 18-22 (Size 22 pictured)
Ribbing:  14/0 Veevus,  Fl Orange or Fl Pink
Body:  14/0 Veevus, White
Coating:  5-minute epoxy or UV resin


Neon Nightmare,  Midge Patterns, TMC Hooks,  Veevus Threads, Brook Trout, Rainbow Trout, Brown Trout, Midge Fishing,

Monday, September 24, 2018

Hot Orange Juice - #24 of 150

No comments:
Hot orange juice doesn't sound like it would whet the human palate, but the pattern finds itself in the corner of a fish's jaw quite often!  The name actually refers to the fluorescent orange thread ("hot") of the body.  

I don't know who thought of  a fluorescent orange midge pattern, but it is absolutely genius and the Hot Orange Juice (HOJ) is quite an effective pattern in various scenarios.  Tie one of these hi-vis snacks on your leader during a large midge hatch and hold on!  The fluorescent orange stands out like a sore thumb among the hundreds of thousands of pupa traveling downstream.   I don't limit myself the the above...   First/Last light, rising waters, slightly off colored water  and periods of insect inactivity are a couple of other ideal times to present the HOJ.

This is tying simplicity!  If you can tie a Zebra Midge then you can tie this elongated hi-vis version.  I also carry a few in standard orange versions aptly names Orange Juice.

Materials:

Hook:  TMC 200R, sizes 16-22 (Size 20 pictured)
Bead:  Appropriate to hook size (1.5mm pictured).
Ribbing:  Hends wire 0.09, gold
Body:  Veevus 14/0 fluorescent orange
Optional:  Coat body with UV resin or Sally Hansen's

Hot Orange Juice,Midge Pattern, Hi-vis Midge Pupa, TMC Hooks, Tungsten Beads, Hends Colored Wire

Sunday, September 23, 2018

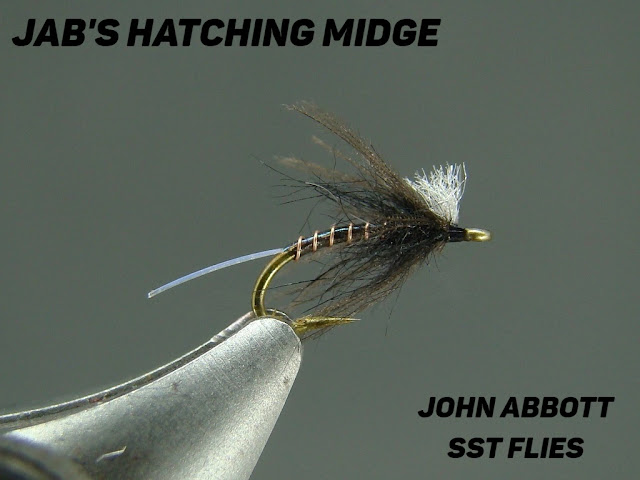
JABs Hatching Midge - #23 of 150

No comments:
If you like to incorporate bugginess into your patterns look no further than my Hatching Midge.  The thorax (muskrat) and collar (CDC) seductively move - even in the slowest of currents - making this a "go to" pattern for both lakes and moving waters.

For a shuck material I've switched from pearl Flashabou to Hends Holostrength simply due to the unique effect.   This seems to have made a difference in the catch ratio however, the switch was made just over a year ago and it might take another season or two to know if this truly makes a difference,  As an option you may add a very short piece of Holostrength in front and over the top of the thorax for additional attraction for off-colored water.

Another switch was in my gill material.  Having tried several options I truly never settled on any one particular material simply because it didn't "look right" or it was too stiff and/or didn't give off enough "pop."  The solution was white Antron dubbing for it's suppleness and translucency without an overpowering effect.  The suppleness allows for movement with the muskrat and CDC.

Materials:

Hook:  TMC 200R or Daiichi 1270, Sizes 12-22 (TMC 200R size 22 shown)
Thread:  18/0 Nano Silk or 14/0 Veevus, Black
Shuck:  Hends Holostrength, pearl, 1/100th"
Ribbing:  Hends 0.09, copper
Body:  Thread
Thorax:  Muskrat dyed black.  Dubbed loosely or use split thread method. (Split thread shown)
Collar:  CDC, natural
Gills:  Antron dubbing, white


JABs Hatching Midge, Midge Emerger, Midge Patterns, Hends Holostrength, Hends Colored Wires, Putah Creek, Muskrat Dubbing, CDC, TMC Hooks

Saturday, September 22, 2018

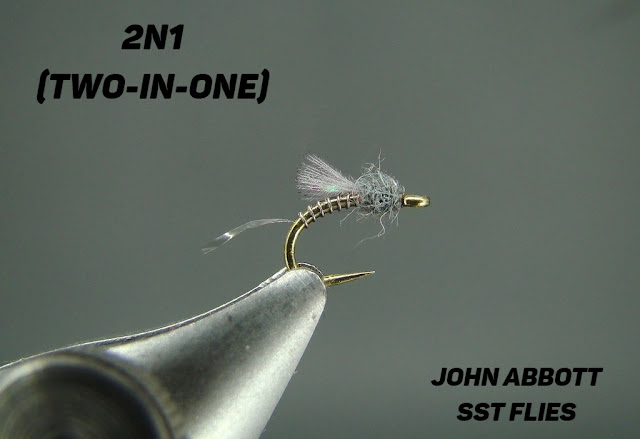
2N1 (Two-In-One) - #22 of 150

No comments:
As the name implies the 2N1 can imitate midges and mayflies.  I mainly tie this pattern in gray and brown, but a few in black, olive, olive brown find slots in the flybox.

You maybe wondering what the shuck material is...  I've been playing around with Body Quill and it seems to be a vast improvement over the typical shuck materials.   Despite the numerous colors available it is transparent and moves through the water much like the Real McCoy.  Just choose a shade or two lighter than your body color...  Black is the exception as it a solid color and light gray Body Quill makes a great shuck.

The main trigger feature is the underwing of Midge Flash.  My only recommendation is keeping it short.  Doing so will keep the "flash" from being too bright allowing (hopefully) the fish to see the shuck.

Since the 2N1 is an emerger pattern I mainly tie it on as my upper dropper so it rides a little higher the in water column.  If you need to fish a little deeper adding a small amount of weight 12 to 15 inches above will do the trick.

Materials:

Hook:  Choice of any curved nymph/scud hook,  sizes 16-24 (Pictured TMC 2488H Size 20)
Thread:  14/0 Veevus or 18/0 Nano Silk, gray or brown (18/0 Nano Silk pictured)
Shuck:  Hend's Body Quill, gray cut to the length of body  (light brown for brown body)
Ribbing:  Hend's 0.09 colored wire, #10 (light brown) with gray body or #30 (black) with brown body (Light brown shown)
Body:  Thread
Underwing:  Midge Flash, light blue dun cut short
Overwing:  Medium slate gray CDC
Thorax:  Slate gray rabbit (shown) or Superfine Dubbing in Adams color for gray body and rust color for brown body.

2N1 Midge Pattern, Midge Emerger, Putah Creek, Body Quill, CDC, Hends Colored Wire, Rabbit Dubbing, Nano Silk

Friday, September 21, 2018

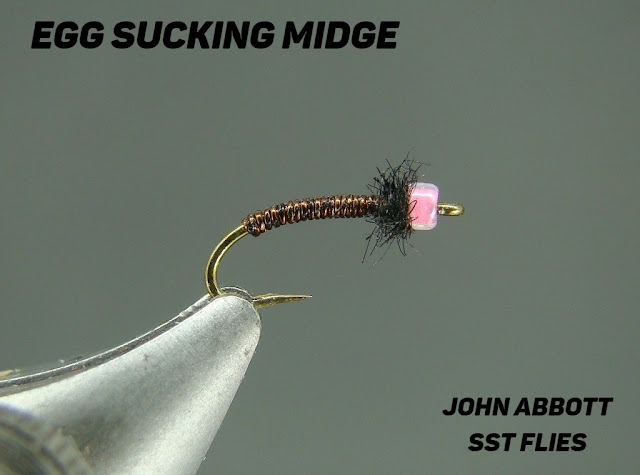
Egg Sucking Midge - #21 of 150

No comments:
The name Egg Sucking Midge (or ESM) is quite the misnomer, eh?   Or is it?   I have delved into the subject  on and off over the years and it appears midge larva feeding on fish eggs is an extremely rare event.  But it does happen...

This pattern is not intended to imitate an egg sucking midge.  Rather I named jokingly at a time where "egg sucking" seem to precede a lot new patterns.  I am guessing the time frame would have been in the early to mid-1990s when this occured.  It is just another midge pattern with a bright pink bead for attraction and highlights the use of embroidery thread for a well segmented body.  However, I've received some pretty strange looks when asked about the pattern on the water.

The ESM is a great all seasons pattern, but it really shines during and right after spawning.  (I don't advocate fishing during the spawn.  Let the fish do their thing.)  Could the pink glass bead, although small in comparsion, signal an egg response from the fish?  Or does the bead act solely as an attractor?   Hmm.. (Insert picture of Rodin's The Thinker.)

Lastly, I also tie the ESM with a bright orange glass bead and mainly fish it late summer into fall.

Materials:

Hook:  TMC 200R or Daiichi 1270, Sizes 16-22.  (TMC 200R, size 20 pictured)
Thread:  18/0 Nano Silk, Black
Bead:  15/0 Glass TOHU, Ceylon Pink (#910)
Body:  DMC Light Effects (Antique) #E898 (Dark Oak) (Dark bronze/brown with black thread core)
Thorax:  Dyed hare's ear, black, taken dirctly from upper ear.

Egg Sucking Midge, Midge Pattern, Midge Pupa, TOHU Glass Bead, DMC Embroidery, Putah Creek


Thursday, September 20, 2018

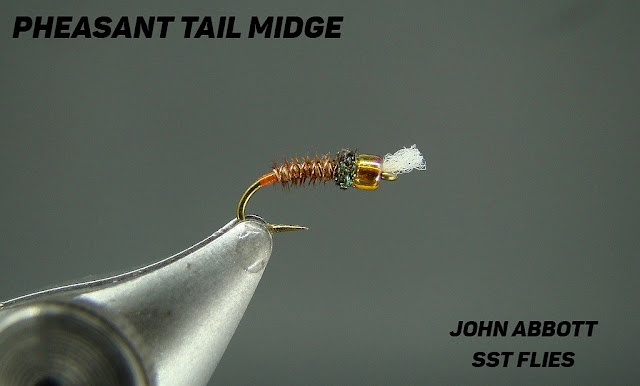
Pheasant Tail Midge - #20 of 150

No comments:
This version of the Pheasant Tail Midge is nothing special.   There quite a few patterns that utilize pheasant tail however, I've added a few twists to make a killer pattern.   Additionally, I'll pass along some helpful hints in tying midge/micro patterns that utilize fragile materials such as pheasant tail and peacock herl.

Materials:

Hook:  TMC 200R or Daiichi 1270, sizes 12-22 (TMC 200R size 22 pictured)
Bead:   Glass or tungsten, size appropriate to the hook (1.5mm glass TOHU topaz/pearl)
Thread:  18/0 Nano Silk, copper
Gills:  Oral-B dental floss
Butt:  Hend's Body Quill, fl. orange
Ribbing:  Hend's 0.09, copper
Body:  Pheasant tail, natural
Thorax:  Sybai Fine Flash, dark brown peacock

Tying Instructions:

1.  Flatten barb with the jaws of your vise.
2.  Place glass or tungsten bead onto the hook and secure hook in the vise.
3.  Slide bead to the rear of the hook.  Start tying thread immediately behind the eye and secure a small piece of Oral-B dental floss to the top of the shank, whip finish and cut thread.  Oral-B is rather thick so you need to split a  down to third or quarter of it's size.  Once secured in place bring bead over the top of the wraps and cut the Oral-B to size.
4.  Start thread immediately behind the bead.  Cut a short length of  Hend's 0.09 copper wire and their fl. orange Body Quill.  Secure wire to the far side of the hook shank followed by the Body Quill.  Securing wraps for both materials should be approximately the same length of the thorax area.
5.  Wrap Body Quill down the hook shank while, at the same time, securing the copper wire.  Ensure ribbing material rests parallel to the hook shank.  Towards the end of the body area lift ribbing up and take a couple more wraps behind the wire.  Return the Body Quill  back to the thorax area and secure.
6.  Select two or three pheasant tail fibers from the lower half the tail.  Theses fibers will be a little stronger than the upper half's.  Next, cut the fibers down to about 60-percent as this portion offers the greatest strength.  Tie in the tips in right at the thorax area and make smooth securing wraps rearward until you reach the ribbing.  Return thread to the thorax.  
7.  Apply a very small amount of super glue the the thread wraps and spread evenly.  Gently counterwrap the pheasant tail fibers forward and secure at the thorax.  Super glue will add extra protection for the fragile fibers.
8.  Once the pheasant tail fibers have been secured with super glue and thread wrap the copper wire forward and secure behind the bead.
9.  For this step I have elected to use a subsitute for the peacock herl due to it's extremely fragile nature in small sizes proportionate to the hook size pictured.  Therefore I used Sybai's Fine Flash in dark brown peacock.   Apply a very small amount of dubbing to the thread (approximately one inch long).  Here's a great trick to hiding the thread wraps...   Whip finish the dubbing!  The pattern  is complete.

Enjoy!

Pheasant Tail Midge, Midge Patterns, Midge Pupa, Hend's Body Quill. Pheasant Tail, Sybai Fine Flash, TOHU Glass beads, Oral-b Dental Floss, Putah Creek

Wednesday, September 19, 2018

Wired Bloody Zebra - #19 of 150

No comments:
I have my own version of the Zebra Midge that may be a little more effective that what you are accustomed to tying/fishing.  If you watched my Putah Creek YouTube video (dated 4/17) where I landed a couple of fish on the "Zebra Midge" this is the pattern...  It's time to share my dirty little secret with you.

What makes it so special?  First, it is heavier and thinner than the standard thread version.  This is by design simply for sink rate in the faster waters of the west and deep water lake fishing.  The pattern is tied strictly with copper wire, tungsten bead and hook... Not a single wrap of thread!   Next the pattern is tied on a longer shank hook for more bite area between the bead and hook point.  Third,  I "bombproof" the entire pattern, including the bead, in a thin coat of UV resign.  Not only does this secure all the materials in place, but the UV resin gives a beautiful translucency, especially in the thorax and over the bead.  A dozen flies will last a very long time.

The Wired Bloody Zebra midge started out as a lake pattern in the Pacific Northwest where we commonly fish midges down to 15-plus feet of water in the winter.  At these depths sink rate is an important factor in getting your flies to the zone down along the bottom in short order.  The pattern eventually migrated to the moving waters of Washington State's Yakima River, Rocky Ford (spring creek) and Deschutes River where it proved itself rather quickly.

Materials:

Hook: TMC 200R or Daiichi 1270, sizes 12-22. (TMC 200R, size 22 pictured)
Bead:  Nickel or silver, sized appropriately to hook size.  (1.5mm nickel shown)
Body:  2-strands black one strand silver.  Wire diameter is dictated by hook size.  (UTC x-small wire is pictured below)
Thorax:  Wire diameter is dictated by hook size.  (Red x-small UTC is pictured on a size 22 below)

The entire pattern, including bead, is coated with a thin layer of UV resin.

Tying notes:

1. Wrap the red wire for the thorax first.  On the size 22 pictured I took 12 wraps of extra small UTC wire. This embedded in the countersunk area of the bead and centered the bead inline with the shank.  You may want a larger thorax diameter.  In which case use UTC small or Hends 0.14 wire.
2.  To get a clear "cut" of the wire slowly twist, or common terminology "helicopter," the wire to prevent a burr sticking out from the hook shank.
3.  The Wired Bloody Zebra is only tied in black, red and silver.  However you may elect to tied the black and silver wire all the way to the bead.   Yet you may find the red thorax adds a little extra to effectiveness.  Different color variations will fall will under other pattern names.

Wired Bloody Zebra, Midge Pattern, Midge pupa, UTC Wire, Tungsten Beads, Zebra Midge


Tuesday, September 18, 2018

Bionic Midge - #18 of 150

No comments:
Mark Boname is the originator of the Bionic Midge.  The Krystal Flash tail makes for a great shuck as well as a trigger feature.  Couple this with the pearlescent wingbuds...  Oh boy!

A lot of anglers will be throwing streamers during periods of slightly off colored water to a foot or so of visbility, but the Bionic Midge fishes well for me during this time as long as the water is covered thoroughly.   I carry this pattern in sizes 18-22 with water clarity dictating what the size to fish vice trying to imitate the naturals.  The obvious choice is fishing a larger sizes as visiblity deteriorates.  Of course the trigger features mentioned above certainly lead to it's success. 

I also fish the pattern in the early morning with clear water conditions.   As the sun rises and more light penetrates the water I often cut back the shuck- sometimes to barely a nub is visible.

Materials:

Hook:  TMC 2488H or 2488, sizes 18-22 (Size 20 pictured)
Thread:  18/0 Nano Silk, black
Body:  Thread
Shuck:  Waspi Midge Flash, rootbeer/pearl
Ribbing:  Hend's 0.09, gold
Wingbuds:  Veevus pearl tinsel, small
Thorax:  Super Fine Dubbing, black.

Bionic Midge, Midge Pupa, Midge Shuck Material, Krystal Flash, Nano Silk, Veevus Pearl Tinsel, Super Fine Dubbing, Midge Patterns.


Monday, September 17, 2018

Size 30 - #17 0f 150

No comments:
A size 30 midge?  I just wanted to see if I could tie one!  A size 28 should be a cake walk, eh?

I plan on tying a few more in different colors..   Let's see if we can capture a fish on the GoPro in the coming days on a size 30...

Materials:

Hook:  Gamakatsu C12-BM, size 30
Thread:  18/0 Nano Silk, Black
Ribbing:  Hend's Superfine, 0.04, silver
Wing:  Hend's Krystal Flash Micro, #100, UV
Thorax:  Super Fine Dubbing, black

Size 30 Midge,  Midge Pattern, Midge Pupa, Midge Emerger, Nano Silk Thread, Hend's Superfine, Krystal Flash, Super Fine Dubbing, Putah Creek


Sunday, September 16, 2018

Power Pupa - #16 of 150

No comments:
I have been tweaking a lot of my midge patterns since arriving in California.  Living so close to some demanding and sometimes unforgiving fish hurled me into adapting rather quickly to what they like and not what my eye wanted.   The finicky tailwater fish of Putah Creek will let you know rather quickly whether or not they like a pattern.

The very first change to the Power Pupa happened when UV resins first came to the market.  Talk about a time saver, less mess, no mixing epoxy and better control during application.  No brainer!

Next I decided the body needed a change,  The orignal body material was Hareline's Micro Tubing which lies flat against the hook shank. Although this provides a nice segmented look it wasn't as pronounced as I like.  Switching to Wapsi's Stretch Round Rib was a great choice and gave me the rounded edges I was looking for.

The most recent change was trying different flashback materials.  For years pearl Flashabou was the choice for a lot of different patterns.  And it is still a first choice for a lot of anlgers/tiers.  However, I was searching for a material with more subtleness in the flash and overall brightness.  This sublteness would break me away from all the other anglers pounding the creek with their flashback Pheasant Tails, Hare's Ears, etc.  So last summer I tied a dozen Power Pupas with Hend's Perdigon tinsels and settled on #30 (black) for the final wingcase material.  (If you haven't played around with these tinsels you are truly missing out on an unique camouflage-like effect.)

Finally, a small change in tying thread...   I now tie the Power Pupa with 18/0 Nano Silk.  This thread has recently become available stateside and is incredible strong.  It will compress the thickest of tubing down to the shank creating a very thin body - just like a chironimid!

Presently I have only had the need to tie the Power Pupa in brown (shown below) and cream.  Other colors may be on the horizon for me, but I would encourage you to tie and experiment with a few for your local waters.

Materials:

Hook:  TMC 200R or Daiichi 1270, sizes 18-22  (TMC 200R, size 20 pictured)
Thread:  18/0 Nano Silk, copper (brown) or cream
Body:  Thread followed by clear Waspi Stretch Round Rib .5mm
Wingcase:  Hend's Perdigon tinsel, 1/69th, #30 
Thorax:  Thread

Tying note:  After the wingcase is brought forward and secured apply a thin coat of UV resin and cure.  Rotate the fly so the bottom is facing up.  Mark the rear portion of the wingcase with an orange indelible marker.  You will need to apply two or three coats of a thin UV resin to get the desired effect of depth in the wingcase and orange indelible ink hot spot.

Power Pupa, Midge Pattern, Midge Larva, TMC Hooks, Daiichi Hooks,  Waspi Strectch Round Rib, Hend's, Perdigon Tinsel


Saturday, September 15, 2018

Ribbon Candy - #15 of 150

No comments:
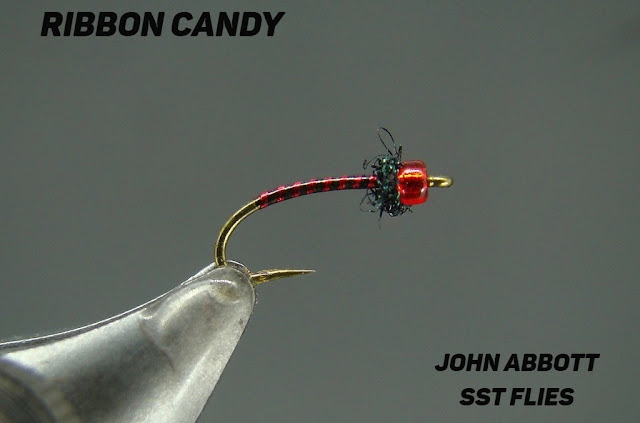
Continuing along with simplistic midge patterns....  The Ribbon Candy (name) reminded me of my youth when grandma had bowls of ribbon candy out around the house during the Holiday Season.   I munched on a ton of the sugary goodness until I was wound tighter than a grandfather clock.    

Good change-up pattern for hard fished waters or sluggish fish that need a little different for an offering.

Tying notes:

1.   Thread (body) color is personal choice.  This one of the few midge patterns that I tie in shades of lt. olive to dark.   Black, brown and even red are definitely colors you'll want in the fly box...
2.   If you decided to tie and fish this pattern the ribbing should always be an iridescent or metallic thread in red.  It is a little finer than Flashabou and definitely has more "shine" to it.
3.  Once the body is complete apply a thin layer of UV resin and cure.  

Materials:

Hook:  TMC 200R or Daiichi 1270, sizes 18-22 (TMC 200R, size 20 pictured)
Bead:  15/0 TOHU glass, red with silver lining.
Thread:  18/0 Nano Silk (black is pictured)
Body:  Thread.color of choice
Ribbing:  Metallic or iridescent threa, red.   Remove the microfilaments,
Thorax:  Sybai's Fine Flash, black.  Keep the thorax narrow and thin

Ribbon Candy, Midge Pattern, Midge Pupa, Nano Silk, Iridescent Thrread, Metallic Thread, Sybai Fine Flash, TMC Hooks, Daiichi Hooks, TOHU Glass Bead


Friday, September 14, 2018

Micro Tube Pupa - #14 of 150

No comments:
Whoever was the first to discover micro tubing came up with a simple and quick tie that will fill up a row or two in a fly box in short order.   

Segmentation on this pattern is created with Hareline's Micro Tubing which provides a very midge-like appearance.   The micro tubing is extremely stretchable and soft yet surprisingly tough as well as incredibly easy to work with- even on the smallest of patterns.

A lot of variations can be tied from this pattern with clear mirco tubing remaining the main ingredient for the smallest of sizes (20-22).   As you progress to the larger sizes Hareline's midge and standard tubing is available.  Experiment with various thread colors for the body as well as bead colors in glass, brass or tungsten.  I am pretty sure you will not be disappointed.

You may also experiment with different colors of tubing, but I feel clear tubing gives the pattern a perfect translucent look and appeal to the fish.

Materials:

Hook:  TMC 200R or Daiichi 1270, sizes 12-22,  TMC 200R (size 20) pictured
Bead:  Sky's the limit!  A 15/0 gray with silver lining glass bead is a favorite of mine.
Thread:  Color of choice and size appropriate to hook.  For sizes 20-22 I prefer 18/0 Nano Silk, sizes 16-18 go with 14/0 or 12/0 and 8/0 for even larger hook sizes.   A smaller diameter this will help ensure the body stay very thin.
Body:  Hareline clear tubing.  (Mirco tubing is pictured).  Underbody is thread color of choice.
Thorax:  Muskrat dyed black.  Keep the thorax thin and narrow.

Micro Tube Pupa, Hareline Micro Tubing, TMC Hooks, Daiichi Hooks, Muskrat Fur, Glass Bead


Thursday, September 13, 2018

Pellucid Midge - #13 of 150

No comments:
Synonyms for pellucid include:  transparent, translucent, crystalline, bright, limpid and unclouded.  This midge pattern certainly lives up to it's name.

The Pellucid is a pattern that I first developed for lakes of the Pacific Northwest when UV resins first came to the market.  When tied in larger sizes (12-16) the UV resin increased sink rates which aided getting the pattern to the desired depths quickly.  In smaller sizes (down to size 22) Pellucid is a proven tailwater killer, too.

Tying Notes:

1.  This is a fairly straight forward pattern to tie.  The body is wrapped extremlely flat, ribbed and followed by shaping the thorax with thread to a narrow oval shape.  Once the whip finish is complete and the thread is cut a modest amount of UV resign is applied and cured.  After the first coat of UV resin has been applied and cured a red indelible ink pen is used to mark the butt section and thorax area.  Once the ink is dry another coat of UV resin is applied over the ink.  The result is a deep glowing and transparent effect in which the red portion of the body/thorax really standout. You may consider using various colors of indelible ink to achieve desired results.  One proven color is orange. You also consider yellow, olive, brown or any flourescent color.
2.  The body and ribbing colors remain constant. 
3.  In smaller sizes I recommend using a thin, flat laying thread to keep the body as thin as possible to avoid too much build up from the UV resin.

Materials:

Hook:  TMC 200 or Daiichi 1270, sizes 10-22.  (TMC 200 size 20 pictured below.)
Thread:  Appropriate to hook size.  (Black 18/0 Nano Silk pictured,)
Body:  Thread.  Two coats thin UV resins,  After first coat applied, red, hot pink, charteuse or orange to the butt section and/or thorax.  A second coat of UV resin is applied over the ink.
Ribbing:  Hend's 0.09, silver
Thorax: Thread

Pellucid Midge, UV resin, Nano Silk, TMC Hooks, Midge Larva. Hends Wire


Wednesday, September 12, 2018

Twinkle Midge - #12 of 150

No comments:
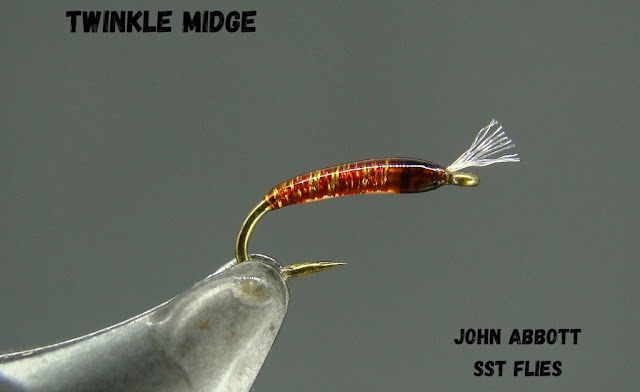
Rick Takahashi, co-author of Modern Midges: Tying & Fishing the World's Most Effective Patterns, is the originator of this solid performing midge pattern.   It is one of the few midge patterns that I often tie and fish in several colors for lakes and rivers.   In fact I have one dedicated 12-compartment box of size 22's and a few boxes peppered with size 18s and 20s.  Most of the patterns I tie are standard "midge" colors, but I do play around with white (pearl) Glitter Thread and use indelible ink to get some wild coloration/mottled effects.

What makes the Twinkle Midge so effective?  The key component I feel is the liberal amount of UV resin Takahashi frequently uses to give the pattern a transparent and unique light refraction/reflection in the water.

Materials

Hook:  TMC 2487 or 2488 (Sizes 18 to 24) or TMC 2000 (Sizes 18-22) (TMC 200, #22 pictured.)
Thread:  8/0 Uni, white or 18/0 Nano Silk
Body: Glitter Thread, color of choice (Rust pictured.)
Gills:  White (pearl) Glitter Thread.  (I remove the pearlescent strand.  However it may be used.)
Head/Thorax:  Thread.

Tying Notes

1.  For materials Takahashi lists white 8/0 Uni for tying thread which is then colored with indelible ink for head/thorax area.   I like to change it up a little by switching the white Uni for copper colored 18/0 Nano Silk.  I then apply indelible ink in brown or black.   This give a unique mottled look to the finished product, as pictured below.  When using white (pearl Glitter Thread) I utilize white 18/0 Nano Silk.
2.  You may find Glitter Thread a little difficult to work when tying sizes 20-24.  A trick I employ is putting a counter-clockwise twist to cord the material up and then stretching the strand.  Doing so will give you better control over the material creating tighter and more even wraps.  The final result should be a nice tapered body, even and noticeable wraps as well as a wonderful mottled effect.
3.  A single coat of UV resin can be applied.  However, applying a couple coats until you've achieved a slight transparent effect really makes the pattern shine when fished.  This is noticeable under the pattern in the picture.

Twinkle Midge, Glitter Thread, UV Resin, Nano Silk, TMC Hooks


Tuesday, September 11, 2018

Red Ass - #11 of 150

2 comments:
The Red Ass is another pattern that utilizes Veevus Body Quill.   The red butt is transparent and imitates hemoglobin in some midges.  However give other colors a try, e.g., chartreuse, fl. yellow, fl. orange and fl. pink.   To compliment the body a wing of Glamour Madeira (see Top Secret Midge) has been added.


Materials

Hook:  TMC 2488, TMC 2488H, Daiichi 1140, sizes 18-22 (TMC 2488H, size 22 pictured.)
Thread:  Veevus 14/0, black
Underbody:  Red Veevus Body Quill (
Ribbing:  Hend's 0.09, silver
Body:  Black Veevus Body Quill
Wing:  Glamour Madeira (thinned down)
Thorax:  Super Fine dubbing, black.


Red Ass Midge, Veevus Body Quill, Hend's, Glamour Madeira, Super Fine Dubbing

Monday, September 10, 2018

JAB's Cream Larva - #10 of 150

No comments:
The spawning period on Putah Creek is just about over.  (Yes it January!)  And it is nearly time is to start making the weekly trips to scratch my head trying to figure out what makes these fish tick.  The creek is fished so hard that bringing your "A Game,"  more often than not, is simply not enough.  

One of the secrets to my success on Putah Creek is constantly changing patterns until I find a pattern that brings continued success during the day.  As hard as is may seem to believe a pattern that brings fish to the net 200-yards upstream may or may not work in the next run.  Do I go through a lot of leader material?  Oh boy!

There are less than two handfuls of the well known patterns that consistently produce fish on this creek.  I try to have at least one of these patterns on my leader at any given time,  However I am constantly in search of the holy grail...   One such pattern is my cream colored larva pattern. 

This pattern is only tied with slight variations of the rib- either copper or brown wire.  And it is only tied in sizes 20 and 22.  I am positive it can be productive in larger sizes, but the Putah fish won't touch them. Additionally, despite the small size, I tie these patterns with cream UTC 70 (approximately 6/0) strictly for the thread color.  It has a distinct shade/color when tied flat against the bronze shank.

The cream larva is a great example of what thead control, indelible ink and UV resin can do to create some awesome patterns.  

Materials

Hook:  TMC 200 or Daiichi 1270, size 20 or 22 (Daiichi size 22 pictured.)
Thread:  UTC 70, cream
Ribbing:  Copper or brown Hend's 0,09
Body/Thorax: Cream UTC 70
Hot Spot:  Red indelible ink
Thorax/Wing Pad:  Brown indelible ink.

Notes:

1.  Once the body is tied flat, and before the ribbing is brought forward, barely touch the butt of the fly with a fine, red indelible ink pen.  This forms the hot spot and represents a small amount of hemoglobin.
2.  Once you've formed the head, whip finished and cut the thread, apply a very thin coat of UV resin and cure.   After the fly has been coated and cured with UV resin mark the upper thorax with brown indelible ink,  When the thorax has dried apply a second thin coat of UV resin over the thorax area.

JAB's Cream Larva, UV Resin, UTC Thread, Indelible Ink, Transparent Larva, TMC, Midge

Sunday, September 9, 2018

JAB's Polar Flash - #9 of 150

No comments:
I have been playing around a lot with different winging materials over the years.  More so now that I reside in California within short distances of some of the best waters an angler can fish.  And these waters contain hungry, midge friendly browns and rainbows

One winging material I have really taken a liking to is Sybai's Polar Flash in UV Gray.  It is mixture of (longer than normal) translucent synthetic fibers and/or UV or pearl flashIt has a nice effect in the water without being too flashy and is a perfect winging material for midges.

The Polar Flash Midge is an easy tie and comprises of a thread body, colored wire, Polar Flash wing and a thorax of Super Fine dubbing.  Color combinations are the sky's limit.  My favorite colors for this pattern on my local waters are:  black/chartreuse (pictured), brown/chartreuse, olive/chartreuse, brown/olive, brown/copper and cream/brown.

The length of wings will vary by tier, but I typically cut them to the end of the body. This allows me to tailor the length on the water, if needed.  With stiff/heavy materials, e.g., Krystal Flash, I cut them just over halfway of the body.

Materials:

Hook:  TMC 2488 or 2488H, sizes 18-24 (Size 22 pictured)
Thread:  14/0 Veevus, color of choice.  (Black pictured)
Ribbing:  Hend's 0.09 color of choice.  (Chartreuse pictured)
Wing:  Sybai Polar Flash, UV Gray
Thorax:  Super Fine dubbing matching body color 

Polar Flash Midge, Midge Emerger, Syabia Polar Flash, Hends Wire, TMC Hooks, Veevus Thread

Saturday, September 8, 2018

JAB's Frostbite Larva - #8 of 150

No comments:
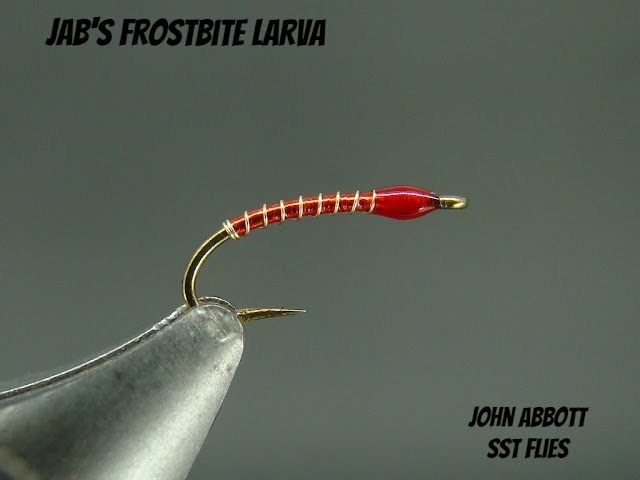
The "Frostbite" turns 30-years old this February and was first used on Putah Creek where it gained a small following.   When I transferred to the Pacific Northwest this little beauty continued to work well for me on the lowland lakes of the Puget Sound region as well as the meanadering Rocky Ford.

The idea came to me one evening while tying steelhead flies.  I don't remember the pattern, but it involved laying a floss tag over french silver tinsel.  This technique is fairly standard for me on soft hackle flies as well.

What makes this pattern so special?  Well...  I'll begin with the camera doesn't quite pick up the  unique attribute of this larva imitation, but it rests with the two material body construction.  Second, it can be fished in both lakes and rivers with good populations of midges available to the fish.  More so in waters with good numbers of both aquatic worms and midges which provide the pattern double duty.

The Secret and Helpful Tying Hints

1)  Here's the secret this pattern.  The body is first layered with silver Flashabou and then over wrapped with Frostbite (a flat translucent synthethic material) or Body Quill.  This combination gives an extremely translucent glow (undescribable yet beautiful).  Although Frostbite is still available it can be tough to find.  And it can be a pain to unravel from the spool as it is loosely woven and knots quickly when preparing it to a workable material.  Thankfully, Quill Body, a near exact facsimile and very easy to work with, is readily available and comes in several colors.
2)  Various colors of Flashabou can be used for the underbody, but nothing comes close to silver for effectiveness.  I'll put gold Flashabou at a close second.  I'll be experimenting with various Perdigon and UV tinsels come this late winter.
3)  Try this on your soft hackles.  Sometimes I cover the entire body with Body Quill, but I usually end up leaving a little tag of Flashabou visible.  A lot of color options for you to try!
4)  Remove the two microfilaments from the Body Quill before tying in and wrapping.  This makes for a smooth flat body.
5)  Various degrees of color can be achieved by addtional wraps of Body Quill.  Experiment a little..
6)  To begin start your thread just behind the eye and leave a small gap. Tie in the ribbing and Flashabou together on the far side of the shank.  Secure with just a few wraps and remove waste ends.  Wrap Flashabou over the ribbing and proceed down the hook shank until you reach a point just aft of the barb area (pictured).  Ensure ribbing runs even and parallel with the shank,  Return to the thorax area securing the Flashabou with flat wraps.   Tie in a single strand of Body Quill or Frostbite and wrap down the hook shank covering the Flashabou.  Return to the thorax area and secure with a few wraps.  The number of turns for the ribbing is a personal choice.  I like to start with one or two turn immediately behind the body and strive for a minimum of 7 over the body.  Once every thing is secured form a neat head and apply your favorite UV resin (5-minute epoxy was used originally).

Materials


Hook:   TMC 200 or Daiichi 1270, 1260, sizes 16 to 22 (Size 20 pictured)
Thread:  14/0 Veevus, color to match body.  However a mismatch body/head color often works well.  Here's an example:  Red Head Midge
Ribbing:  Gold wire, fine.  (Pictured is Sybai's 0.10)
Underbody:  Silver Flashabou
Overbody:  Body Quill, red
Head: Thread with two coats of thin UV resin

Midge Larva, Frostbite Midge, Body Quill, Flashabou, TMC Hooks, Daiichi Hooks

Here's an example of this technique on a steelhead pattern.  Red Frostbite was applied over silver french tinsel.


Friday, September 7, 2018

Brassie (Variant) - #7 of 150

No comments:
Hard to believe the original Brassie was a scud imitation, eh? The copper wire body was simply wrapped around the hook and a thorax of heat shrink tubing was utilized for the thorax.  And according to Gary Borger a throat of pheasant tail was applied in some variations.  Now there are so many variants it would be hard to name them all.  I'll keep it simple...  However, a lot is owed to Ken Chandler and Tug Davenport for coming up with the Brassie in the late 1960's.

When I first started flinging and tying flies in the mid 1970's copper wasn't remotely difficult to find  A tier could simply buy a small spool or salvage rotary telephones, scrap household wiring, guitar pick-ups (or any magnetic current device), etc.  Colors ranged from bright to dark cooper with some extremely bright wire appearing orange!  My favorite shade was a darker carmel color- somewhat of an "antique" shade.  However what was difficult was procuring different colors of copper. 

Sometime in the late 1970's/early 1980's (I don't remember) colored copper wire was becoming more common in fly shops, but it was restricted to red and green.  Nowadays the color selection is pretty amazing with different shades and hues depending on the distributor.  It is not uncommon to see one manufacturer/distributor to have a bright but matte finish while another has a bright and shiney finish.  It will pay to experiement with these finishes/shades/hues...  Believe it or not the fish in certain waters can get pretty persnickety,  And I've seen it happen more than once when exchanging notes and patterns with my fellow anglers.  This may be one of the reasons a lot of anglers have a love/hate relationship with this pattern.

Remember the beginning of this blog post when I mentioned numerous variations?  Let me give you just a few to get you started:

1)  The original Brassie was simply copper wire.  So changing colors anywhere from natural earthtones to wild fluorescent colors is an obvious choice.
2)  Although the original thorax was heat shrink tubing (doubtful anyone is still utilzing this material) peacock herl became the obvious choice with tiers/anglers.   You may also run into and/or try muskrat in gray or black for the thorax.   My preference will remain natural materials and I am partial to the under fur of Australian opossum (as pictured below) for it's action in the water.  Don't overlook the newer synthetics- mainly material such as Ice Dubbing or finer cuts of similar material.  
3)  Utilizing two colors of wire has become increasing popluar.  Not only does segmentation still exist, but it is highlighted by the lighter colored wire.
4)  Nowadays I simple wrap the wire around the hook (I do not tie it in) and apply UV resin to "bombproof" the pattern.  This keeps the body thin and gives a translucent appearance; which. I feel adds more effectiveness to the pattern.

Materials

Hook:  Any standard shank nymph or curved hook, sizes 14-24 (Pictured TMC 2488 size 20)
Thread:  Appropriate to color of wire and hook size.  (Pictured 14/0 red Veevus)
Body:  Copper wire color of choice and diameter appropriate to hook size. (Red Hend's 0.14 diameter)  A thin coat of UV resin may be applies.
Thorax:  Peacock herl is the most common material.  Various natural hairs or synthetic are viable substitutes.  (Pictured is the under fur of Australian opossum spun in a dubbing loop.)
.

Thursday, September 6, 2018

Three Dollar Dip (Variant) #6 of 150

No comments:
The Three Dollar Dip pattern was devised by the late Nick Nicklas of Blue Ribbon Flies.  It is a variation of the renown Serendipity. The differences between the two patterns are the body and wing pad  (thorax).  "The Dip" is tied with a thread body to keep the body thin vice twisted Z-lon used on the Serendipity.  Additionally, "The Dip" uses bleached deer hair vice natural color.  However, some anglers tie "The Dip" in either natural and bleached depending on their taste.  I typically use natural color deer for nearly all my patterns.  The exception is imitating midges and PMD's in the cream to creamy-yellow colors I'll utilized bleached hair.

This particular variation adds Krystal Flash to the wing pad for extra attraction.  For sizes 14-18 one strand of Krystal Flash is added to each side of the wind pad.  In sizes 20-24 a single strand of Waspi's Midge Flash is tied in over the top of the wind pad.  In crystal clear water I cut a significant amount of this overwing wing away usually to the end of the wing pad.  If I feel this is still spooking fish I'll remove even more.

On the Three Dollar Dip the tier has a choice of either allowing the butts of deer to remain visible or hidden under the thread wraps.  In small midge sizes I elect the latter.  I feel it makes for a much cleaner fly.

Tying notes

1.  Body and ribbing color combinations are numerous!  Have fun experimenting on your home waters.  I typically keep things pretty simple in black, brown, olive. and cream,  However I do fish a cream with red or yellow ribbing every so often.
2.  Make every attempt to keep your thread as flat as possible.  Many anglers, including me, believes this makes the pattern that much more effective- especially in midge sizes.  Additionally, a smooth body is the foundation for even ribbing wraps!
3.  Here's a great tip for a neat and clean head on this pattern.   Remove the hair from the skin.  Ensure all under fur is removed.  You now have butt ends and a tips of the hair.  Use the hair just under the tips and cut a new butt secion.  This hair is more narrow and not quite as thick, coarse and hollow as the butt section.   

Materials

Hook:  Any curved or standard nymph hook, sizes 14-24. (Pictured TMC 2488, size 22)
Body:  Thread (Size is appropriate to the hook).  Color of choice.  (Brown 14/0 Veevus pictured.)
Ribbing:  Appropriately for the size of hook.  (Hend's 0.09 in copper is shown)
Wind pad/Thorax:  Bleach or natural deep hair clipped to half body length on curved shanked hooks.  Just under the mid body length on straight shank hook.
Overwing:  1 or 2 strands of pearl Krystal Flash or Midge Flash.  See above.  

Three Dollar Dip, Serendipity, Midge Pattern, Madison River

Wednesday, September 5, 2018

Electric Midge - #5 of 150

1 comment:
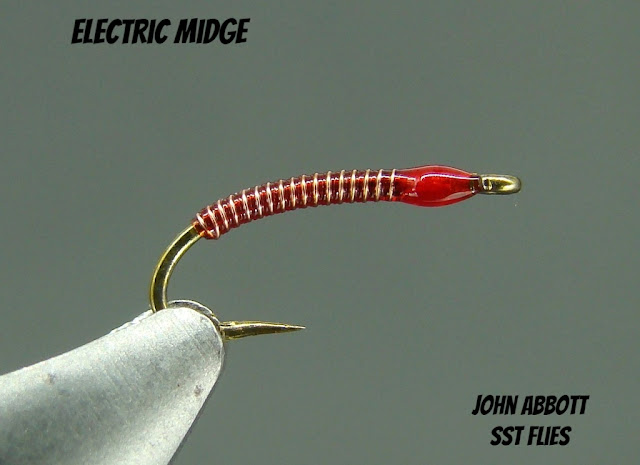
I absolutely love this pattern and it is one that normally gets tied on the leader first when using a two or three fly searching rig.  

The Electric Midge holds a few attributes that contribute to an outstanding midge pattern.  Besides a slender body and sementation it's translucency is second to none.  

A whole host of color schemes can be achieved with different colored micro tubing and wire.  I keep this simple, but tie a few and find out what works best for you waters!  And don't worry about too much flash.  The micro tubing does a decent job of muting the brightness.

Materials

Hook: TMC 200 or Daiichi 1270, Sizes 18-22.  (TMC 200 size 20 pictured.)
Thread:  14/0 Veevus, red
Body/Rib:  Hend's 0.09 gold extra fine wire is inserted into blood red micro tubing.
Head:  Thread built to a small taper and UV resin is applied to the threads wraps.

Tying instructions

1.  Prepare body and ribbing by cutting approximately 4-inches of micro tubing and wire.  Apply a little saliva, water or baby oil to the wire.  Hold the wire and tubing verically and slowly work the wire down through the tubing.  (Keeping the tubing and wire vertical is the fastest/easiest way I found to complete this step).  Prepare a few  tube/wire combinations if you intend to tie more than few flies.
2.  Pinch barb of the hook with the jaws of the vise.  Secure hook.
3.  Start securing wraps almost directly behind the eye.  Leave a small space for the whip finish.
4. With the tubing and ribbing flush at the end secure combination on the far side of the shank.  Make smooth, flat and touching wraps rearward to a postion just rear of the barb as pictured.  A smooth and flat layer of thread will determine how well your body/ribbing looks!
5.  This step can be a little tricky...  Stretch tubing, but not too tight, as breaking the wire is a possibility.  Wind combination forward with touching wraps to a position of 2 to 2 1/2 eye lengths behind the eye (as pictured).  Secure combination on the nearside of the hook shank by making two securing wraps and then bending the combination parallel to the shank.   Take a few more securing wraps forward towards the eye.  Stretch tubing and then wiggle the combination.  The wire will break at this point and you can now cut away the remaining tubing.
6.  Build a small tapered head, whip finish and apply a coat or two of UV resign.

Electric Midge, Midge Larva, Mirco Tubing, TMC Hooks, Hend's Fly Tying, UV Resin

Tuesday, September 4, 2018

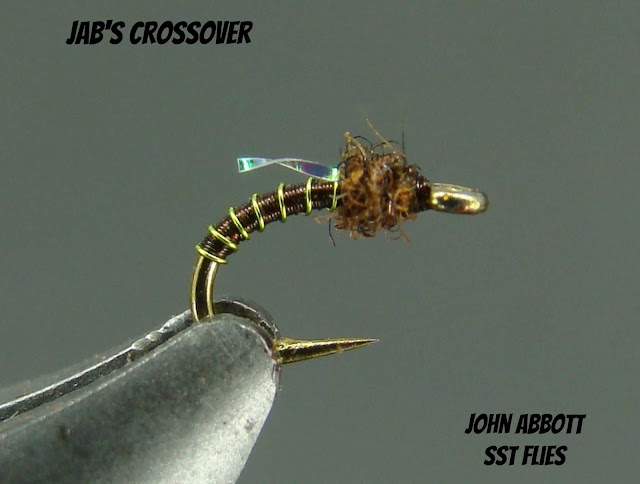
JAB's Crossover - #4 of 150

No comments:
My home tailwater is chock full of midges and baetis nymphs in color ranges light olive to dark brown.  It only made sense to devise a pattern that was representitive, or at least close enough, of both morsels that keep the fish fat and happy.

JAB's Crossover is tied with white Danville's Spiderweb (30 denier - 16/0) thread.   This allows me to get the color ranges needed for various waters utilizing Sharpie, Copic or Pantone indelible ink pens.  

Spiderweb lays flat and will tie even the smallest of flies.  My old eyes stop at size 22 these days..

Tying Notes

1.  For cream or light colors of Crossovers I would wrap an extra layer of thread for the body to keep the hook color from bleeding through when wet.  Additionally the thorax is tied with Buggy Nymph Dubbing in hare's hare vice the dark hare's ear.
2.  The chartreuse ribbing remains regardless of the body color.
3.  Black is a great color and may represent some of the clinger nymphs in your waters.  Swap out dark hare's hare's ear color for black Buggy Nymph Dubbing.

Materials

Hook:   TMC 2488, sizes 18-22 (Size 22 pictured)
Thread:  Danville Spiderweb.  Use indelible ink for body color choice.  (Brown Sharpie pictured.)
Ribbing:  Hend's 0.09 extra fine, chartreuse wire.  First wrap should be behind the thread body.
Wing:  Waspi's Midge Flash, Lt Blue Dun/Pearl.  Cut to approximately 2/3 or 3/4 body length. Single wing for size 20/22.  Double the wing for size 18.
Thorax: Buggy Nymph Dubbing, dark hare's ear.

JAB's Crossover, Midge Emerger, Baetis Nymph, Spiderweb Thread. Hend's Wire, TMC Hooks

Monday, September 3, 2018

JAB's Tailwater Midge Series, Red - #3 of 150

No comments:
My Tailwater Midge Series is a variant of the Disco Midge and was tailored to meet the selective rainbows of Rocky Ford in Washington State..  I soon discovered the red version worked wonders on California's Putah Creek; which, I now frequent regularily.

The Tailwater Series can be tied in various colors to meet your local waters.  The main criteria will be matching the color of the thorax to the thread underbody by mixing natural muskrat with an equal amount of Super Fine dubbing.   The thorax is then picked out.  The fine hairs and fibers will breath in the slower currents.

I usually fish this pattern down along the bottom in conjuction with a tunsgsten beaded pattern(s).  The red appears is dynamite during water releases when both midges and aquatic worms are dislodged from rising current speeds.

For those of you that fish the Upper Sacramento River I recommend the Tailwater Black in the heat of the summer when the SBS (Small Black Stuff or Small Black Sh*t as many put it) is the ticket for consistency.

I would also recommend a few tied up in bright colors such as fl. pink, fl. orange and chartruese as back-ups for the slow days.  

Materials

Hook:  Daiichi 1270 or TMC 200, sizes 16-22 (TMC 200 #20 pictured)
Thread:  14/0 Veevus, red
Body:  Thread
Overbody:  Veevus pearl tinsel small (Flashabou can be used, but it is not as strong as the Veevus tinsel.)
Thorax:  50/50 mixture of red Super Fine dubbing and natural muskrat picked out

Tying Instructions

1.  Smash barb of the hook with the jaws of the vise and secure.
2.  Start tying thread approximately half an eye length behind eye and make a few securing wraps rearwards.
3.  Remove approximately 6-inches of small pearl tinsel from the spool and secure to the top of the hook shank with flattened thrad wraps.  Continue rearwards until you reach an area just behind the barb (as pictured).
4.  Bring flat thread wraps forward to the thorax area.  The flat thread wraps keep the body thin.
5.  Wind pearl tinsel forward with close touching turns to the thorax area and secure.
6.  Apply a sparse amount of dubbing to the thread and build a thin and short thorax.  The thorax should be approximately 1/5 to 1/6 of the body length.
7.  Whip finish.


Tailwater Midge Series,  Tailwater Red, Disco Midge, Midge Larva, Midge Pupa, Upper Sacramento River

Sunday, September 2, 2018

JAB's Red Head (Midge) - #2 of 150

No comments:
My JAB's Red Head (or Red-headed Step Child) is a solid all around midge pattern for both lakes and stream.  Numerous color combinations are available to the tier however, black/red. cream/red, tan/red and oilve/red are the top producers.  What ever body color you decide to tie ensure the Holoshimmer matches the body color.  With a cream body pearl Holoshimmer is preferred over Flashabou.

A pupa pattern can be tied with Antron, Sparkle Yarn or Fluoro Fiber in either white or gray,  The wing is tied in prior to forming/completing the head.

Materials

Hook:  Daiichi 1270 or TMC 200, Sizes 18 to 22 (Daiichi 1270 #20 is pictured)
Thread:  14/0 (Veevus) color of choice
Ribbing:  Sulky Holoshimmer (Dark Pewter is pictured) #6002
Head:  14/0 Veevus, red

Cover the entire body/body with a coat or two of UZ resin.

Midge Larva, Sulky Holoshimmer, MidgePupa, Red Head, Uv Resin, Fly Tying