Translate

Showing posts with label Lake Patterns. Show all posts

Saturday, September 8, 2018

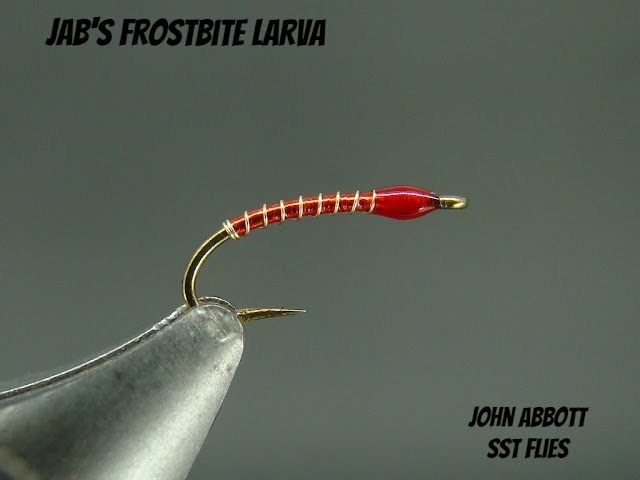
JAB's Frostbite Larva - #8 of 150

No comments:
The "Frostbite" turns 30-years old this February and was first used on Putah Creek where it gained a small following.   When I transferred to the Pacific Northwest this little beauty continued to work well for me on the lowland lakes of the Puget Sound region as well as the meanadering Rocky Ford.

The idea came to me one evening while tying steelhead flies.  I don't remember the pattern, but it involved laying a floss tag over french silver tinsel.  This technique is fairly standard for me on soft hackle flies as well.

What makes this pattern so special?  Well...  I'll begin with the camera doesn't quite pick up the  unique attribute of this larva imitation, but it rests with the two material body construction.  Second, it can be fished in both lakes and rivers with good populations of midges available to the fish.  More so in waters with good numbers of both aquatic worms and midges which provide the pattern double duty.

The Secret and Helpful Tying Hints

1)  Here's the secret this pattern.  The body is first layered with silver Flashabou and then over wrapped with Frostbite (a flat translucent synthethic material) or Body Quill.  This combination gives an extremely translucent glow (undescribable yet beautiful).  Although Frostbite is still available it can be tough to find.  And it can be a pain to unravel from the spool as it is loosely woven and knots quickly when preparing it to a workable material.  Thankfully, Quill Body, a near exact facsimile and very easy to work with, is readily available and comes in several colors.
2)  Various colors of Flashabou can be used for the underbody, but nothing comes close to silver for effectiveness.  I'll put gold Flashabou at a close second.  I'll be experimenting with various Perdigon and UV tinsels come this late winter.
3)  Try this on your soft hackles.  Sometimes I cover the entire body with Body Quill, but I usually end up leaving a little tag of Flashabou visible.  A lot of color options for you to try!
4)  Remove the two microfilaments from the Body Quill before tying in and wrapping.  This makes for a smooth flat body.
5)  Various degrees of color can be achieved by addtional wraps of Body Quill.  Experiment a little..
6)  To begin start your thread just behind the eye and leave a small gap. Tie in the ribbing and Flashabou together on the far side of the shank.  Secure with just a few wraps and remove waste ends.  Wrap Flashabou over the ribbing and proceed down the hook shank until you reach a point just aft of the barb area (pictured).  Ensure ribbing runs even and parallel with the shank,  Return to the thorax area securing the Flashabou with flat wraps.   Tie in a single strand of Body Quill or Frostbite and wrap down the hook shank covering the Flashabou.  Return to the thorax area and secure with a few wraps.  The number of turns for the ribbing is a personal choice.  I like to start with one or two turn immediately behind the body and strive for a minimum of 7 over the body.  Once every thing is secured form a neat head and apply your favorite UV resin (5-minute epoxy was used originally).

Materials


Hook:   TMC 200 or Daiichi 1270, 1260, sizes 16 to 22 (Size 20 pictured)
Thread:  14/0 Veevus, color to match body.  However a mismatch body/head color often works well.  Here's an example:  Red Head Midge
Ribbing:  Gold wire, fine.  (Pictured is Sybai's 0.10)
Underbody:  Silver Flashabou
Overbody:  Body Quill, red
Head: Thread with two coats of thin UV resin

Midge Larva, Frostbite Midge, Body Quill, Flashabou, TMC Hooks, Daiichi Hooks

Here's an example of this technique on a steelhead pattern.  Red Frostbite was applied over silver french tinsel.


Wednesday, May 10, 2017

50 Shades Of Hare's Ear: #46

No comments:
#46   Hare's Ear Matuka

Notes:

(1)  The Matuka streamer is one of my favorites.  It can be tied several ways, but a strip wing tied on a tube is my preferred version.
(2)  Big browns, rainbows, searun cutthroat, steelhead and even salmon have fell victim to this version of the Matuka.  I tie it in several colors, mostly natural materials, but experiment with various synthetics and/or combinations of both.
(3)  This hare's ear version showcases the possible uses for different areas of the mask.  The body was built up with the stiff and longer hairs found at the base of the ears.  It was then wound over two layers of tungsten sheeting.
(4) The rib is doubled gold wire and twisted.  Not only does this provide a bigger profile, but it strengthens the ribbing.
(5) The collar was formed in a dubbing loop from the hair found on back of the mask just below the ears.  This hair is generally long, soft and straight.
(6)  When complete the pattern look terrible full and bulky.  It will slim down considerable when wet.
(7)  Hold on.  Strikes to this pattern are heart-stopping!

Materials

Hook:  3XL or 4XL.  I typically tie this pattern on a tube.  (Pictured is a TMC 200 size 6.)
Thread:  6/0 color to match.  I prefer UTC 70.  Although Danville 6/0 is a better choice for most tiers.
Ribbing:  Fine, gold, round. Doubled and twisted.  Five turns.
Body:  Hare's ear.  Color of choice.  Raked directly from the base of the ear. 
Wing:  Muskrat zonker strip, natural.
Head/Collar:  Hair from the back of the mask just below the ear.

50 Shades Of Hare's Ear, Hare's Ear Matuka, Muskrat Zonlker Strips, Hare's Mask, Matuka Streamer.

Monday, March 20, 2017

Flies Of Yesteryear: Trueblood Shrimp

2 comments:
As a young teenager, some four decades ago, I would have never been without a few of Ted Trueblood's shrimp pattern on my local pond chasing stunted bass, crappie, perch and bluegill. These scrappy little guys absolutely loved this pattern as well as a Hare's Ear.   Now, in my middle aged years, these simple and impressionistic flies intrigue me.  So much so I have a fly box dedicated solely to flies of yesteryear.  Every so often I get a wild hair to fish retro - fiberglass and flies - and daydream of what fishing was like in those days...
 
As the name implies, Ted Trueblood designed his pattern to imitate shrimp in lakes and spring creeks. However, word soon hit the streets the Trueblood Shrimp could be fished successfully for different species in waters that lacked shrimp altogether.   Some literature from the 1970's suggests the fish may take the Trueblood Shrimp for callibaetis nymphs, too.  I believe this to hold weight as the local pond of my youth certainly did not contain scuds.  And I looked hard for them!

The effectiveness of the very simple fly comes from the use of seal's fur and a super impressionistic silhouette of several aquatic insects.  The Trueblood Shrimp, or Otter Nymph, flat out catches fish!

Tying Notes:

(1)  The Trueblood Shrimp is/was often called an Otter Nymph
(2)  Nearly every older pattern book lists the body material as a 50/50 mixture of otter and cream (natural) seal.  However, the exact ratio of otter to seal is 80/20 respectively.  More specifically, the otter should fur should come from the belly.  I have stuck to the 50/50 ratio due the my preference for the translucency of seal and confidence the fly is more effective with this ratio.
(3)  Another original portion of the recipe calls for brown thread if the fly is to be unweighted and green thread for weighted.  Green looks terribly tacky to me...  I used brown thread for weighted flies and tan thread for unweighted.
(4)  Various scud color combinations are highly encouraged.  Various shades of olive and dyed partridge has been very effective for me in British Columbia.
(5)  In the picture below the notable thick hairs is seal fur.  You can see just how translucent this fur is and how the Trueblood Shrimp, or any fly tied with seal, becomes a truly effective fly.  

Materials:

Hook:  Trueblood tied this pattern on a Mustad 3906B or 7957BX in sizes 8-16.  I've tied it on a Hanak 230BL, size 12.
Thread:  See note 3 above.
Tail:  Brown partridge
Body:  Otter and cream (natural) seal.  80/20 mixture respectively
Beard:  Brown partridge to hook point.

Ted Trueblood, Otter Nymph, Trueblood Shrimp, Seal Fur, Fly Patterns, Scud Pattern, Shrimp Pattern, Callibaetis Pattern

Tuesday, March 7, 2017

Flies Of Yesteryear: Carey Special

No comments:
Let's head back a little further in the time vault with a pattern synonymous with the Pacific Northwest- the Carey Special.  Sometime in the 1920's, I cannot exactly pinpoint the year, Colonel Tom Carey devised his now famous pattern to likely represent dragonfly nymphs found in the lakes of British Columbia.

There is a ton of history behind Col. Carey and his Carey Special in British Columbia.  I've read Col. Carey was terribly persnickety about his pheasant rump patches and a perfectionist when tying. Whether it represent the dragon nymph we will never know.  But when tied with various materials and thickness/thinness the pattern can be tied to mimic damsels, leeches or minnows, too.  Even some thought has been written about the patterns effectiveness as an emerging caddis.

The Carey Special is my favorite lake pattern.  Even as a kid I can remember trolling the fly behind hardware and catching a lot of trout with a fly wrapped with a peacock body.  Now into mid life, I have experimented with nearly every material or fur under the sun and still find the fly effective. Early in the season, when the water is still cold, this pattern with a fluorescent colored floss bodies tied thin really racks up the numbers of planter trout.  When the spring gives way to summer I start tying my Carey's with seal for thicker bodies.  I also have a few pigeon holes in the box for olive floss bodies to mimic damsels.  Black floss bodies and rump works well for leech imitations.

The Carey Special is a Northwest icon, but my friends to the east would be doing themselves a huge favor by tying and trying a few.  I have caught largemouth and smallmouth bass, crappie, bluegill and even a turtle on the Carey!  Give it a go!

Tying notes:

(1)  The original Carey Special calls for a tail of pheasant rump, a body of pheasant tail fibers ribbed with black linen thread, and a collar of pheasant rump.
(2)  There are truly endless materials to wrap for a body.  Peacock, estaz, floss, natural furs, hair, etc. Each and every one of these materials work.  You'll need to pinpoint which material and colors work best for your area, but shades of olive and peacock are really hard to beat.
(3)  Dyed pheasant rump patches are available.  Even more color combinations!
(4)  I often tie the Carey without a tail.  This alleviates the short strikes sometimes associated with this pattern.

Materials:

Hook:  2XL or 3XL, sizes 4 - 10
Weight:  Optional.  Brass, tungsten or glass beads work well
Thread:  UTC70. color to match body
Tail:  Pheasant rump fibers
Body:  Choice.  Medium olive seal is pictured
Collar:  Pheasant rump wrapped