Translate

Showing posts with label Leech Patterns. Show all posts

Wednesday, May 10, 2017

50 Shades Of Hare's Ear: #46

No comments:
#46   Hare's Ear Matuka

Notes:

(1)  The Matuka streamer is one of my favorites.  It can be tied several ways, but a strip wing tied on a tube is my preferred version.
(2)  Big browns, rainbows, searun cutthroat, steelhead and even salmon have fell victim to this version of the Matuka.  I tie it in several colors, mostly natural materials, but experiment with various synthetics and/or combinations of both.
(3)  This hare's ear version showcases the possible uses for different areas of the mask.  The body was built up with the stiff and longer hairs found at the base of the ears.  It was then wound over two layers of tungsten sheeting.
(4) The rib is doubled gold wire and twisted.  Not only does this provide a bigger profile, but it strengthens the ribbing.
(5) The collar was formed in a dubbing loop from the hair found on back of the mask just below the ears.  This hair is generally long, soft and straight.
(6)  When complete the pattern look terrible full and bulky.  It will slim down considerable when wet.
(7)  Hold on.  Strikes to this pattern are heart-stopping!

Materials

Hook:  3XL or 4XL.  I typically tie this pattern on a tube.  (Pictured is a TMC 200 size 6.)
Thread:  6/0 color to match.  I prefer UTC 70.  Although Danville 6/0 is a better choice for most tiers.
Ribbing:  Fine, gold, round. Doubled and twisted.  Five turns.
Body:  Hare's ear.  Color of choice.  Raked directly from the base of the ear. 
Wing:  Muskrat zonker strip, natural.
Head/Collar:  Hair from the back of the mask just below the ear.

50 Shades Of Hare's Ear, Hare's Ear Matuka, Muskrat Zonlker Strips, Hare's Mask, Matuka Streamer.

Tuesday, March 7, 2017

Flies Of Yesteryear: Carey Special

No comments:
Let's head back a little further in the time vault with a pattern synonymous with the Pacific Northwest- the Carey Special.  Sometime in the 1920's, I cannot exactly pinpoint the year, Colonel Tom Carey devised his now famous pattern to likely represent dragonfly nymphs found in the lakes of British Columbia.

There is a ton of history behind Col. Carey and his Carey Special in British Columbia.  I've read Col. Carey was terribly persnickety about his pheasant rump patches and a perfectionist when tying. Whether it represent the dragon nymph we will never know.  But when tied with various materials and thickness/thinness the pattern can be tied to mimic damsels, leeches or minnows, too.  Even some thought has been written about the patterns effectiveness as an emerging caddis.

The Carey Special is my favorite lake pattern.  Even as a kid I can remember trolling the fly behind hardware and catching a lot of trout with a fly wrapped with a peacock body.  Now into mid life, I have experimented with nearly every material or fur under the sun and still find the fly effective. Early in the season, when the water is still cold, this pattern with a fluorescent colored floss bodies tied thin really racks up the numbers of planter trout.  When the spring gives way to summer I start tying my Carey's with seal for thicker bodies.  I also have a few pigeon holes in the box for olive floss bodies to mimic damsels.  Black floss bodies and rump works well for leech imitations.

The Carey Special is a Northwest icon, but my friends to the east would be doing themselves a huge favor by tying and trying a few.  I have caught largemouth and smallmouth bass, crappie, bluegill and even a turtle on the Carey!  Give it a go!

Tying notes:

(1)  The original Carey Special calls for a tail of pheasant rump, a body of pheasant tail fibers ribbed with black linen thread, and a collar of pheasant rump.
(2)  There are truly endless materials to wrap for a body.  Peacock, estaz, floss, natural furs, hair, etc. Each and every one of these materials work.  You'll need to pinpoint which material and colors work best for your area, but shades of olive and peacock are really hard to beat.
(3)  Dyed pheasant rump patches are available.  Even more color combinations!
(4)  I often tie the Carey without a tail.  This alleviates the short strikes sometimes associated with this pattern.

Materials:

Hook:  2XL or 3XL, sizes 4 - 10
Weight:  Optional.  Brass, tungsten or glass beads work well
Thread:  UTC70. color to match body
Tail:  Pheasant rump fibers
Body:  Choice.  Medium olive seal is pictured
Collar:  Pheasant rump wrapped


Thursday, March 2, 2017

Flies Of Yesteryear: Casual Dress

No comments:
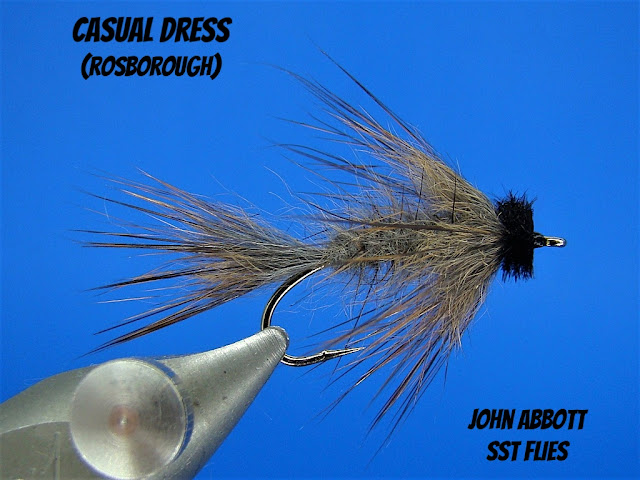
We're not headed back in time too far.  The year was 1960 when three experimental (Casual Dress) nymphs were introduced to the waters of Oregon's Deschutes River where it enters the Wickiup Reservoir.   Long story short the nymphs immediately racked up some pretty impressive catches and E. H. "Polly" Rosborough's nymph continues to find the end of a leader to this day.

I'll be honest... I don't fish this nymph very often in the rivers (where I should probably spend more time doing so) strictly due to the type of water(s) I fish, but in the lakes the fly really shines for me.  I am not sure what the fish take it for, perhaps a leech, damsel or dragon fly nymph, but the tail and collar definitely provide enough undulating action that the takes are very hard!

The Casual Dress is suggestive of many aquatic food forms and only requires two materials tie- muskrat and ostrich herl.  Rosborough writes, "While is appears to represent some tidbit of very active food, to the fish, it really simulates nothing more than just that, food."

Tying notes:  (" " indicates direct quotes Rosborough's Tying and Fishing the Fuzzy Nymphs.

(1)  Although Rosborough doesn't specifically mention adding weight to his patterns, you may do so if desired.  He does mention "plenty of cement" (varnish) along the thread before the body is wound.  I usually weight the forward portion of the hook shank,
(2)  Even though the body is spun in a dubbing loop Polly pens, "It may look ragged enough as it is, but I score it anyways so the guard hairs are feathered out like centipede legs."  Rosborough used a hacksaw blade to score his fly bodies.
(3)  Just a personal preference, but I like a lot of guard hairs.  Especially when I tie the Casual Dress for lake fishing!
(4) I cannot tell you how many times I've read Rosborough book, but there's no reference to spinning the collar.  It does appear the fur from pelt was tied directly to the shank and then maneuvered around for 360-degree coverage.  If someone knows for sure please contact me.

Materials:

Hook:  2XL or 3XL hook.
Thread:  UTC 70, black
Tail:  Small clump of muskrat from the pelt.  Guard hairs left in place.
Body:  Muskrat. Body is formed by winding material in a dubbing loop.  Well picked out.
Collar:  Small clump of muskrat with guard hairs from the pelt spun in a dubbing loop.  
Head:  Ostrich, dyed black.  

Casual Dress Fly, Polly Rosborough, Muskrat Patterns, Fuzzy Nymphs

Wednesday, October 7, 2015

JAB's Schlappen Leech

No comments:
Schlappen feathers are found between the saddle hackle and tail feathers of a rooster.  The webby fibers are ideal for salmon and steelhead patterns as well as many saltwater applications, but I have never seen other tiers use schlappen on trout patterns. However, I have found them to be of exceptional value for leech patterns due to their movement in the water.

While tied in the Carey Special style, the beauty of this pattern is with a few changes in color, thickness, shortening of the hackle or even leaving the tail off, you instantly have flies that represent damsels, dragons and baitfish.

The hackle makes the fly to appear bulky, but rest assured, this fly slims down considerably.

Materials

Hook:  Daiichi 1260 (or any curved 3xl nymph hook), sizes 4-12.  Weight to suit or bead
Thread:  6/0 or 8/0 color to match
Tail:  (Optional)  10 to 15 schlappen feather fibers depending on hook size.  Angel Hair highlights
Body:  Ice Dubbing (peacock black).  Can be anything tier desires.
Hackle (1):  Angel Hair
Hackle (2):   2 or 3 turns of schlappen

Step 1:

Pinch barb in vise.  Secure hook.  Start thread approximately one eye length behind eye.  Wind thread rearward to position pictured.


Step 2:

Select a thin stemmed metallic sheen schlappen feather with fibers slightly longer than the hook length.   Group approximately 15 fibers from the butt area, align tips  and remove from the  stem.   Measure fibers to a distance slightly longer then the body.  Tie in and advance thread forward and return.


Step 2a:

Tie in 5 or 6 fibers of Angel Hair to the near side of hook shank.


Step 2b:

Draw forward fibers to the opposite side of hook and secure with rearward wraps of thread.


Step 2c:

Cut Angel Hair at staggered lengths with a few extending past the schlappen fibers.  The first cut is made at approximately 3/4 of the length of tail.  Overall tail length is now approximately one hook shank.


Step 3:

Apply a sparse amount Ice Dubbing to thread to keep body thin.


Step 3a:

Wind dubbing forward to produce a thin body.  Don't worry about making a pretty body...


Step 3b:

Pick a little dubbing out.


Step 4:

Tie in approximately 12 to 15 fibers of peacock black Angel Hair to the top of the shank.  Spread fibers over the top 180-degrees.


Step 4a:

Repeat the above step for the underside of the hook.  You should have 360-degrees of coverage around hook.


Step 4b:

Gather all fibers and make staggered cuts length between the hook point and just past the bend of the hook.


Step 5:

Utilizing the same schlappen feather used for tail, tie by the tip end and concave side down.  Length of fibers should extend past hook bend.


Step 5a:

Lift feather straight up and stroke the fibers straight back (essentially doubling them).  I moistening the fibers first.  Make  2 or 3 wraps and secure.  Whip finish.


Step 5b:

Apply two coats of head cement.  Ensure first coat is completely dried before applying second.


Enjoy!

Tuesday, October 6, 2015

Silly Wabbit

No comments:

The Silly Wabbit is nothing more than a version of the Bunny Leech without the hide.  The tying process takes a little more time, but by tying the pattern this way allows the tier to produce miniature versions without all the bulk and weight of a soggy hide yet still retain the excellent motion/action of rabbit.

I typically fish the Silly Wabbit without or very little weight for cruising fish in shallow waters and a very slow retrieve.

Hot  beads  instantly makes this  pattern an Egg Sucking Wabbit.  Additionally, small  amounts of Angel Hair tied in along the tail or in the body offer some interesting highlights.

Fill a row or two in the fly box with various weights and colors of the Silly Rabbit.


Materials

Hook:  Daiichi 1260 (or any 3XL hook), size 4-12 (size 10 pictured), weight to suit or bead
Thread:  6/0 or 8/0 color to match
Tail:  Rabbit  
Body:  Rabbit spun in dubbing loop

Step 1:

Pinch barb utilizing vise.  Secure hook.  Start thread one eye length behind eye and wrap thread rearward to area between the hook point and barb.


Step 2:

Select a thin clump of rabbit hair from the hide.  Align tips, cut and secure to the top of the shank. Tail length is approximately one hook length.


Step 3:

Form a dubbing loop and wax thread.  Cut a length of Zonker strip, moisten hair and insert in to loop. Maneuver tips so they are approximately 1 1/2 times the hook gap.  Cut butts ends of rabbit close to the thread.  Spin dubbing loop to form a chenille-like appearance. 


Step 4:

Draw hair rearwards and advance forward in close (not too close) touching turns. This is allow the hair lay back and provided additional movement in the water.  Whip finish and apply head cement.  


Enjoy!

Sunday, October 4, 2015

Devil's Advocate

No comments:
Do you want an absolutely deadly leech pattern? This fly has taken numerous trout, largemouth and smallmouth bass, carp and spiny ray species everywhere I have fished!

The Devil's Advocate received it's indoctrination in a place most people wouldn't believe if they saw the event take place themselves.  After a very fishless morning in 25-degree weather using every traditional pattern known to catch fish in these renowned waters, I decided to try something a little off the wall.  I have had great days using Wooly Buggers at this location, especially in white, but this leech pattern, while a little odd, was worth a shot.  What did I have to lose?

I originally designed the Devil's Advocate for the stunted largemouth bass in the lake I once lived on for the coming spring.  But sure enough... the Rocky Ford rainbows attacked the Devil's Advocate with abandonment first.  The rest is, as the old saying goes... history!

Materials:

Hook:  TMC 200BL (or any curved nymph hook), sizes 4-10
Thread: 6/0 Black (or color of tail/collar)
Tail:  Rabbit strip
Rear collar:  Rabbit spun in a dubbing loop
Body:  Veevus iridescent thread or thread built up in a taper and covered with Clear Cure Goo, epoxy or Liquid Fusion.  (Glitter may be added.) 

Step 1:

Place hook in vise.  Start thread approximately one eye length behind eye and wind rearward to position pictured.  


Step 2:

Tie in rabbit strip. The hide portion of the strip should equal approximately one half of the hook shank. 


Step 3:

Make a dubbing loop and wax thread.  Apply hair in loop and cut butt ends close to thread.  Butt ends should be tapped slightly with finger to align hair closer to thread.


Step 3a:

Spin hair to form chenille-like rope.  Wet and draw fiber rearward while winding hair 3 to 5 wraps in close tight turns.  Build a slight thread taper as shown.  Whip finish.

Length of collar is a personal choice, but I prefer approximately half a tail length.  This will add a beautiful action to the fly.


Step 4:

Start iridescent thread approximately mid body.


Step 4a:

Build a slight taper over the hook shank.  Whip finish behind eye.


Step 5

Apply a thin coat of Clear Cure Goo (thin or hydro) over the thread taper and zap with UV torch (light).   A second or third coat of UV resin may be desirable.    Finished!


The Devil's Advocate can be tied in numerous colors.  The standard black, purple, olive, and red colors are deadly for lake fishing!  Another idea to mention is the utilization of different size rabbit strips (or squirrel or mink)- not only in length, but magnum or mirco widths according to species targeted and hook size. 

Have fun with this pattern.  It is deadly!

Enjoy!

Saturday, October 3, 2015

Acrylic Leech

No comments:
The beauty of having a good selection of leech patterns is the ability to fish them anywhere. Granted the majority of the time these patterns are tied thin and reserved for still or slow moving waters, but when tied proportionately in forage colors, they can be used in fast waters, too! That's right, olive and brown or combinations of these two colors make for wonderful crayfish or sculpin patterns.

The name Acrylic Leech comes from the type of yarn used in it's construction.  Ah... good 'ol yarn might be one of the most under-utilized tying material in present day circles. and rightfully so.   There are so many other options available to tiers it has become mind numbing.  

There are a lot of different manufacturers of 100-percent acrylic yarn, but the best comes from Yarnology due to iridescence and very fine fibers making for unparalleled movement.  Yarnology craft yarn is available in 35-colors (earth tones and vivid fluorescents) and comes on a 20-yard card.   The only down fall is the lack of an olive color, but white can be easily dyed in various shades following the Rit's color formula guide.   Hobby Lobby occasionally has this yarn on sale for 69-cents per card- stock up!

Here's a great chance to get creative with different color combinations of yarn and Angler Hair.  

Materials:

Hook:  Daiichi 1260 (or choice), sizes 4-12
Bead:  Choice 
Thread:  Match body color (Shown is 10/0 Veevus)
Tail:  Marabou (color to match body materials)
Body:  50/50 mixure of dark red and black acrylic yarn highlighted with Angel Hair (black light).

Step 1:

Pinch barb with vise.  Place bead on hook and secure hook.  Start thread behind bead and advance rearward.  Just before hook point make and secure a dubbing loop.


Step 2:

Select marabou plume.  Draw longer fibers away from tip section, cut and discard.


Step 2a:

Draw a small amount of longer fibers back to the natural position to even tips and tie in.  Tail length is approximately one hook length.

Removing the stem allows the marabou to move more freely in the water.


Step 3:

Sparingly place premixed dubbing in the dubbing loop.  

To make the dubbing cut 1/2-inch to 3/4-inch lengths of yarn and blend together in a coffee grinder. Once thoroughly blended, add Angel Hair and mix by hand or simply add a few strands as you apply dubbing inside of the loop.

The addition of Angel Hair truly makes this fly!  Not only does it add a little extra flash, but as gives an excellent "hackle" appearance.


Step 3a:

Twist loop to form a chenille.   Make close wraps forward while drawing fibers rearwards.  All fibers should standout as pictured.


Step 4:

Lightly brush fibers rearward.  Apply head cement to the first inch of thread and whip finish.


Enjoy!