Translate

Showing posts with label Other Patterns. Show all posts

Thursday, May 25, 2017

Desk Mess Flies: #1

No comments:
Desk mess flies?  Every so often my tying area becomes an absolute disaster area!  It is amazing how big of a mess I can make and still know exactly where everything rests.  Bits, pieces and clippings of waste hair, fur, flosses, various dubbings, tinsels and half used feathers find themselves in little piles among the masses of packages I should have tucked back into the storage bins as I finished.  Once my short lived procrastination stage is over packages start finding their way back into draws and bins. Underneath these piles and mounds the waste becomes apparent.  Should I used these waste byproducts or simple place it in the trash?

There are quite a few tiers that find a purpose for their tiny scrapes that would have otherwise made it in the "circular file."  I've seen some pretty incredible flies and results.  One memory that will always stick in my mind was meeting a gentleman on the Upper Sacramento River who was catching a tremendous amount of fish.  After watching the gentleman for a half an hour or so I approached him. "What's the secret fly?" I asked.  He mentioned, "Nothing more than a simple black fly."  I had a good look and noticed the black tail fibers, but the body material threw me..  "What's the body?" I asked.  "It is the fluff from the base of a mallard feather" he said and continued with, "The tail and body is from dyed black mallard."  "I don't like to throw anything away so I re-purpose or save it." 

A desk mess can bring out the creativity and well as reduce waste saving money.  Occasionally I get a wild hair (no pun intended) to use the "leftovers."  A lot of the flies show promise and find a dark corner in the fly box until the time comes when fishing is slow.   You'll find that some flies will catch fish while fish laugh at the others.  Sometimes a little tweaking here and there of the original desk mess fly will often produce a solid fly!

Have some fun!

Hook:  Firehole 316, Size 10
Bead:  8/0 Tohu glass, Rainbow Rosaline, Opaque Purple Lining #928
Weight:  Fine tungsten wire
Thread:  Whatever is on the bobbin!
Tail:  Mottled brown hen
Ribbing:  Perdigone ribbing material, UV black
Body:  The dark, short and spikey hair taken directly from the ear of a hare's mask
Thorax/Collar:  Sybai Fine Flash, Black


Flies tied from your mess left on the desk!  Glass beads, hares ear, perdigones, Sybai fly tying materials

Tuesday, May 23, 2017

Desk Mess Flies: #2

No comments:
My cleaning efforts are winding down.  I can now see my blue desk mat as well as background board!  This hasn't kept me from tying..  No sir.  I am little pumped!  The mess has become a love/hate relationship!

Another desk mess fly!

Hook:  Firehole 316, Size 10
Bead:  3/16" Brass, Black
Weight:  An additional 15 wraps of .020 lead free wire
Tail:  Grizzly Micro Legs, Fl. Orange
Body:  2-strands of DMC Floss, Antique Effects #E310 and 1-strand of Sulky Holoshimmer, Lt. Copper # 6011 tightly twisted clockwise and wound forward.
Legs: Grizzly Micro Legs, Fl. Orange
Thorax/Collar:  Sybai Fine Flash, Black


Flies tied from the mess on the desk, Rubber legs, DMC floss, Sybai Fine flash, Brass beads, Firehole Stick Hooks

Saturday, May 20, 2017

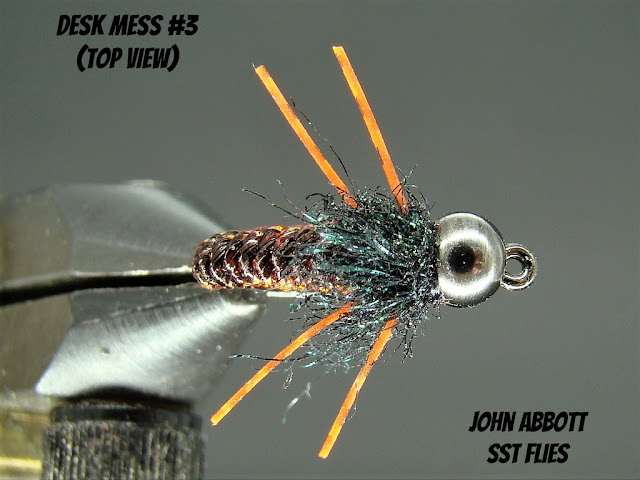
Desk Mess Flies: #3

No comments:
Good Lord...  The bottom of the pile has been reached!  Time to make a mess again.

This fly changed significantly even though I used the same materials from the Desk Mess #2 fly.

Tying note:

I stripped off approximately 4.5 feet of Sulky Holoshimmer to make the body.  No need to worrying about blowing through this material.  It comes on a 250-yard spool.  Simply keep doubling the material until you have 8 to 10 inches to work. Tie off to the far side of the hook.  Twist clockwise tightly and wrap forward.

Materials:

Hook:  Firehole 316, Size 10
Bead:  3/16" Brass, Black
Weight:  An additional 15-wraps of .020 lead free wire.
Thread:  UTC70, Black (On one of my bobbins.)
Body:  Sulky Holoshimmer, Lt Copper #6011.  Darken the back with black indelible ink.
Legs:  Grizzly Micro Legs, Fl. Orange
Thorax/Collar:  Sybai Fine Flash, Black


Flies tied from the mess on your desk, Firehole Sticks Hook, Sulky Holoshimmer, Sybai Fine Flash, Indelible ink, Brass beads

Top View

Flies tied from the mess on your desk, Firehole Sticks Hook, Sulky Holoshimmer, Sybai Fine Flash, Indelible ink, Brass beads

Thursday, April 27, 2017

50 Shades Of Hare's Ear: #34

No comments:
50 Shades Of Hare's Ear

#34  Filoplume thorax and tail

Hook:  Hends BL554, sizes 10-16 (Size 12 pictured)
Bead: (Optional)
Weight;  To suit
Thread: UTC 70, brown
Tail:  Filoplume or fluff from the base of a grouse or partridge feather
Ribbing:  Lagartun, Small oval, gold
Body:  Natural hare's ear taken from the base of the ear with with a little Sybai's Fine Flash, UV
Wingcase:  Pheasant tail, natural
Thorax:  Filoplume from a grouse or partridge

Notes:

(1)  Oh boy!  Where do I start?  Solid performer in lakes and slower waters.  This has been an excellent callibaetis pattern for me.
(2)  Filoplume looks awful thick when dry, but thins down significantly when wet.  Prime movement!
(3)  The filoplume is a weak material.  Therefore, you will want to place it in split thread or a dubbing loop to apply it.  


Wednesday, April 26, 2017

50 Shades Of Hare's Ear: #33

No comments:
50 Shades Of Hare's Ear

#33  "Hot" Thorax

Hook:  Hends BL554, sizes 10-16 (Size 12 pictured)
Bead: (Optional)
Weight;  To suit
Thread: UTC 70, fl. chartreuse
Tail:  Peacock sword, 3 to 5 barbs
Ribbing:  Lagartun, Small oval, gold
Body:  Natural dark hare's ear taken from the base of the ear
Wingcase:  Ozark Oak mottled turkey
Thorax:  Chartreuse or insect green (Hareline Dubbing)

Notes:

(1)  A hot thorax is a good choice for high, spring runoff or slightly murky waters.
(2)  This is a great fly for panfish when fished slow or tied on a jig head.
(3)  Change up the color of the thorax.  Fluorescent colors as well as purple or even darker shades of hare's ear are excellent choices and fill avoid in your fly box.  Pink, red and orange will work wonders when the fish are eating eggs!
(4)  I normally tie my Hare's ear with an approximate 60-percent body/40-percent thorax.  However, with the hot thorax I shorten the thorax area to approximately 30-percent and slightly pick out the fur. This keeps the body from being overshadowed by the brighter thorax.


Tuesday, April 25, 2017

50 Shades Of Hare's Ear: #32

No comments:
50 Shades Of Hare's Ear

#32  Peacock Herl Body

Hook:  Hends BL554, sizes 10-16 (Size 12 pictured)
Bead: (Optional)
Weight;  To suit
Thread: UTC 70, brown
Tail:  Mottled hen, light
Ribbing:  Hends, gold 0.1mm doubled, twisted and counterwrapped.
Body:  Peacock herl taken from just below the eye
Wingcase:  Pheasant tail, natural
Thorax:  Natural hare's ear taken from the base of the ear mixed with Sybai's Fine Flash, UV

Notes:

(1)  The combination of peacock and hare's ear makes any fly a winner.   Look no further than Perry Griffin's 20-incher stonefly pattern for proof!
(2)  I've weighted this fly with tungsten strips wrapped down the shank and doubled in the thorax area.


Wednesday, April 19, 2017

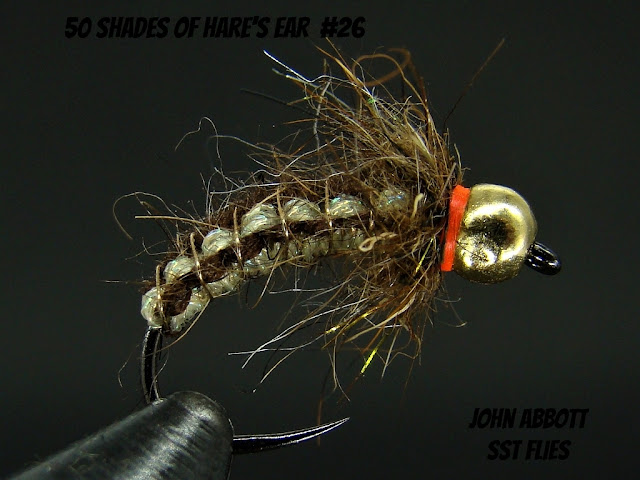
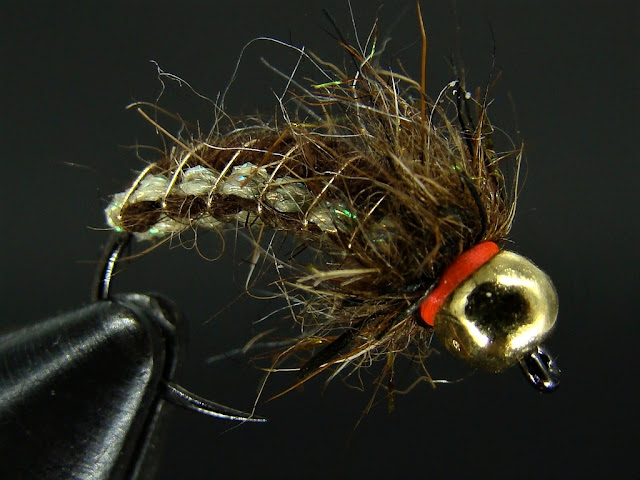
50 Shades Of Hare's Ear: #26

No comments:
50 Shades Of Hare's Ear


#26  Polish Woven Nymph, Hare's Ear


Hook:  Fulling Mill Czech Nymph, sizes 10-16 (Size 12 Pictured)
Bead:  3.5MM gold tungsten
Weight:  Tungsten sheeting cut into a strip and wrapped around hook shank.  Thorax doubled (or lead wire).
Thread: UTC 70, fl. fire orange
Rib:  Hends 0.1MM gold
Body:  DMC embroidery thread, pearl effect #E746 and dark brown #938
Collar.Thorax:  Mixture of brown hare's ear, tan Antron yarn, brown deer hair and Sybai's Fine Flash. fiery brown.

Notes:

(1)  It is recommended to utilize UTC 140 to quicken the time it takes to form a taper.  The head is finished with 70-denier.
(2)  The number of floss strands is dictated by the hook style and size.  I am using 3-strands of pearl (bottom) (same color as tinsel) and 4-strands of dark brown.
(3)  Before the each knot is secure tightly a very small pinch of hare's ear is inserted into the loop then tightened.  I applied the hare's ear every other knot.
(4)  If you haven't an opportunity to fish woven nymphs you are missing out on some hot pattrns!


Gold Ribbed Hare's Ear, Fulling Mill Hooks, DMC Embroidery Floss, Hare's Mask, Hare's Ear

Top

Gold Ribbed Hare's Ear, Fulling Mill Hooks, DMC Embroidery Floss, Hare's Mask, Hare's Ear

Bottom

Fulling Mill Hooks, DMC Embroidery Floss, Hare's Mask, Hare's Ear

Front angle

Fulling Mill Hooks, DMC Embroidery Floss, Hare's Mask, Hare's Ear

Monday, April 10, 2017

50 Shades Of Hare's Ear: #17

No comments:
50 Shades Of Hare's Ear


#17  Glass Bead Caddis

Hook:  Hends BL554, sizes 10-16 (Size 12 pictured)
Bead:  Size appropriate for hook.  Color of choice (2.8MM copper pictured)
Thread: UTC 70, olive and Sybai gold wire, 0.01MM
Body:  11/0 Japanese Toho, silver lined frosted peridot #27F.  Olive hare's ear mixed with a slight amount insect green rabbit.
Thorax:  Dyed brown hare's ear mixed with a slight amount of J. Fair's Seal Sub in black and Sybai's Fine Flash, fiery brown.  Slightly picked out.

Notes:

(1)  The size and number of glass beads used for the body are dependent upon the hook and style.  As a general rule sizes 16 and 14 will use four or five 15/0 beads respectively
(2)  The thread and gold wire are combined and then dubbed upon  Once the amount of fur desired has been applied to the wire/thread combination take a few wraps behind the rear bead and then wind over the next bead repeating the process until the thorax region is reached.  The gold wire will bleed through when wet.
(3)  This pattern is a variation of the original Glass Caddis.  Colors and sizes can be change to meet your local waters.


Sunday, April 9, 2017

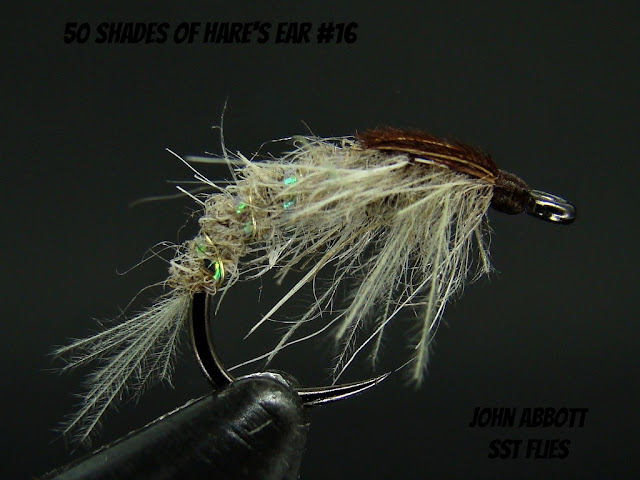
50 Shades Of Hare's Ear: #16

No comments:
50 Shades Of Hare's Ear


#16  CDC Tail and Thorax

Hook:  Firehole 316, sizes 10-16 (Size 12 pictured)
Weight; Tungsten sheeting cut into a strip and wrapped forward.  Thorax area is doubled.
Bead:  Optional
Thread: UTC 70, brown
Tail:  CDC, light blue dun
Body:  Hare's ear, natural
Ribbing:  Sybai .01MM gold wire.  Veevus pearl tinsel, small
Wingcase:  Pheasant tail, natural
Thorax:  Natural hare's ear and lt blue CDC

Notes:

(1)  The split thread method is utilized to apply the thorax.  A small amount of hare's ear is placed between the thread opening.  Once the desired length and amount have been added CDC fibers are cut from the stem and placed across the top of hare's ear. The thread loop is closed trapping both materials.  Spin clockwise.
(2)  A great pattern for the heads of pools and tailouts.

Hare's Ear, Firehole Hooks, CDC. Pheasant Tail. UTC Ultra Wire, Veevus Tinsel

Monday, March 20, 2017

Flies Of Yesteryear: Trueblood Shrimp

2 comments:
As a young teenager, some four decades ago, I would have never been without a few of Ted Trueblood's shrimp pattern on my local pond chasing stunted bass, crappie, perch and bluegill. These scrappy little guys absolutely loved this pattern as well as a Hare's Ear.   Now, in my middle aged years, these simple and impressionistic flies intrigue me.  So much so I have a fly box dedicated solely to flies of yesteryear.  Every so often I get a wild hair to fish retro - fiberglass and flies - and daydream of what fishing was like in those days...
 
As the name implies, Ted Trueblood designed his pattern to imitate shrimp in lakes and spring creeks. However, word soon hit the streets the Trueblood Shrimp could be fished successfully for different species in waters that lacked shrimp altogether.   Some literature from the 1970's suggests the fish may take the Trueblood Shrimp for callibaetis nymphs, too.  I believe this to hold weight as the local pond of my youth certainly did not contain scuds.  And I looked hard for them!

The effectiveness of the very simple fly comes from the use of seal's fur and a super impressionistic silhouette of several aquatic insects.  The Trueblood Shrimp, or Otter Nymph, flat out catches fish!

Tying Notes:

(1)  The Trueblood Shrimp is/was often called an Otter Nymph
(2)  Nearly every older pattern book lists the body material as a 50/50 mixture of otter and cream (natural) seal.  However, the exact ratio of otter to seal is 80/20 respectively.  More specifically, the otter should fur should come from the belly.  I have stuck to the 50/50 ratio due the my preference for the translucency of seal and confidence the fly is more effective with this ratio.
(3)  Another original portion of the recipe calls for brown thread if the fly is to be unweighted and green thread for weighted.  Green looks terribly tacky to me...  I used brown thread for weighted flies and tan thread for unweighted.
(4)  Various scud color combinations are highly encouraged.  Various shades of olive and dyed partridge has been very effective for me in British Columbia.
(5)  In the picture below the notable thick hairs is seal fur.  You can see just how translucent this fur is and how the Trueblood Shrimp, or any fly tied with seal, becomes a truly effective fly.  

Materials:

Hook:  Trueblood tied this pattern on a Mustad 3906B or 7957BX in sizes 8-16.  I've tied it on a Hanak 230BL, size 12.
Thread:  See note 3 above.
Tail:  Brown partridge
Body:  Otter and cream (natural) seal.  80/20 mixture respectively
Beard:  Brown partridge to hook point.

Ted Trueblood, Otter Nymph, Trueblood Shrimp, Seal Fur, Fly Patterns, Scud Pattern, Shrimp Pattern, Callibaetis Pattern

Tuesday, March 7, 2017

Flies Of Yesteryear: Carey Special

No comments:
Let's head back a little further in the time vault with a pattern synonymous with the Pacific Northwest- the Carey Special.  Sometime in the 1920's, I cannot exactly pinpoint the year, Colonel Tom Carey devised his now famous pattern to likely represent dragonfly nymphs found in the lakes of British Columbia.

There is a ton of history behind Col. Carey and his Carey Special in British Columbia.  I've read Col. Carey was terribly persnickety about his pheasant rump patches and a perfectionist when tying. Whether it represent the dragon nymph we will never know.  But when tied with various materials and thickness/thinness the pattern can be tied to mimic damsels, leeches or minnows, too.  Even some thought has been written about the patterns effectiveness as an emerging caddis.

The Carey Special is my favorite lake pattern.  Even as a kid I can remember trolling the fly behind hardware and catching a lot of trout with a fly wrapped with a peacock body.  Now into mid life, I have experimented with nearly every material or fur under the sun and still find the fly effective. Early in the season, when the water is still cold, this pattern with a fluorescent colored floss bodies tied thin really racks up the numbers of planter trout.  When the spring gives way to summer I start tying my Carey's with seal for thicker bodies.  I also have a few pigeon holes in the box for olive floss bodies to mimic damsels.  Black floss bodies and rump works well for leech imitations.

The Carey Special is a Northwest icon, but my friends to the east would be doing themselves a huge favor by tying and trying a few.  I have caught largemouth and smallmouth bass, crappie, bluegill and even a turtle on the Carey!  Give it a go!

Tying notes:

(1)  The original Carey Special calls for a tail of pheasant rump, a body of pheasant tail fibers ribbed with black linen thread, and a collar of pheasant rump.
(2)  There are truly endless materials to wrap for a body.  Peacock, estaz, floss, natural furs, hair, etc. Each and every one of these materials work.  You'll need to pinpoint which material and colors work best for your area, but shades of olive and peacock are really hard to beat.
(3)  Dyed pheasant rump patches are available.  Even more color combinations!
(4)  I often tie the Carey without a tail.  This alleviates the short strikes sometimes associated with this pattern.

Materials:

Hook:  2XL or 3XL, sizes 4 - 10
Weight:  Optional.  Brass, tungsten or glass beads work well
Thread:  UTC70. color to match body
Tail:  Pheasant rump fibers
Body:  Choice.  Medium olive seal is pictured
Collar:  Pheasant rump wrapped


Monday, March 6, 2017

Flies Of Yesteryear: Skunk Hair Caddis

No comments:
In his 1976 tome, Nymph Fishing For Larger Trout, Charles (Charlie) Brooks describes his own pattern, "Difficult fly to make, due to the difficulty of tying the hair down so that it will not loosen, and keeping it twisted tightly enough so the turns remain separate.  It is the best cased caddis imitation I know of, and has taken many fish for me over the last twenty some years.  I just wish there was an easier way to tie it."  

Don't let the aforementioned scare you from tying Shunk Hair Caddis.  If it wasn't for me wanting a somewhat aesthetically pleasing picture I would have knocked out nearly a dozen within the hour. Give this pattern a shot.  It is very deadly and perhaps still the best imitation for cased caddis.

Tying notes:

(1)  This fly should be weighted heavily to get down into the rocks,  I used tungsten sheeting cut into strips and wrapped.  Lob casting here I come!
(2)  The body is made by tightly twisting skunk hair taken from the tail.  You'll want to find the longest of the hairs (typically located between the mid section and tip).  These hairs are generally around 4-inches in length.  Once the hair is removed from the tail, align the the tips and tie in near the rear of the body.   Pull hair straight down to tighten the bunch and then tightly twist counter-clockwise.  Use the rotary feature of your vise.  This will keep the hair twisted, but you may have to slightly re-tighten to keep the segmented look even.  Leave a little extra room at the head of the fly for securing the skunk hair.
(3)  Charlie recommended 2XL hooks sizes 6 to 10.  I used a TMC 200R style hook to mimic the slight bend in the caddis' case.

Materials:

Hook:  2XL nymph or curved nymph hook. e.g, TMC 200R, sizes 6 to 10.  (Size 8 pictured.)
Thread:  3/0 or 6/0, black
Body:  Skunk hair taken from the tail and tightly twisted
Ribbing:  Copper tied in at the head and wrapped rearward and then back over the body..
Hackle:  Soft black hen, one or two turns,

Skunk Hair, Charlie Brooks, Cased Caddis, Cased Caddis Imitations

Sunday, March 5, 2017

Flies Of Yesteryear: Squirrel

No comments:
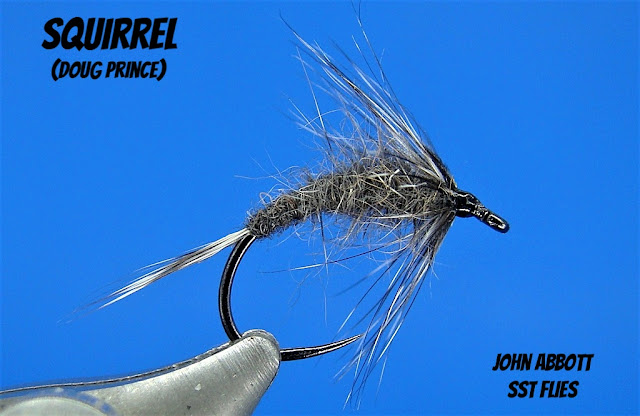
Here's another simple yet highly effective Doug Prince pattern.   Let's take a quick look at his Squirrel pattern.

Tying notes:

(1)  Prince would have tied his squirrel on either a Mustad 3906B or 7957BX hook.  I have given it a slight modern look by tying the pattern on Fulling Mill's Czech Nymph Hook for more an emerger profile.
(2)  Early pattern books call for leaving the guard hairs in with the dubbing and a shaggy body picked out.  This time I elected to only picked out the thorax area to simulate the wing case opening during emergence.
(3)  The pattern recipe calls for gray squirrel body however, I went with a professionally tanned Russian squirrel.  The hair is softer and a slightly darker gray.

Materials:

Hook:  1XL or 2XL nymph hook, sizes 6-14.
Thread:  Black, size of choice. (12/0 Veevus pictured)
Tail:  Squirrel guard hairs taken from the back
Body:  Squirrel body
Hackle:  Hen, grizzly

Doug Prince, Prince nymph, squirrel dubbing, grizzly hackle, guard hair,, Doug Prince fly patterns

Thursday, March 2, 2017

Flies Of Yesteryear: Casual Dress

No comments:
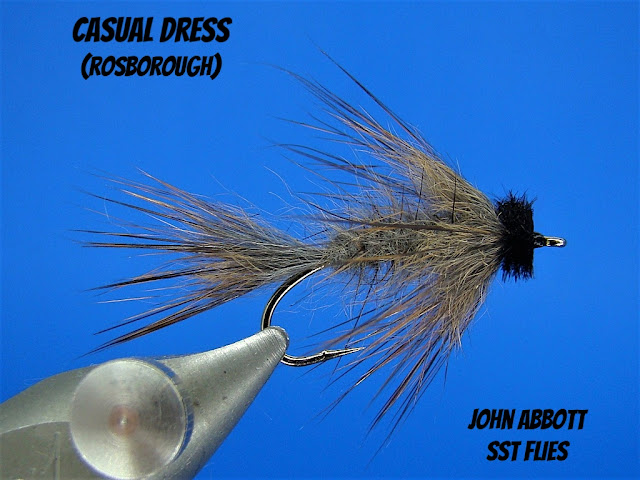
We're not headed back in time too far.  The year was 1960 when three experimental (Casual Dress) nymphs were introduced to the waters of Oregon's Deschutes River where it enters the Wickiup Reservoir.   Long story short the nymphs immediately racked up some pretty impressive catches and E. H. "Polly" Rosborough's nymph continues to find the end of a leader to this day.

I'll be honest... I don't fish this nymph very often in the rivers (where I should probably spend more time doing so) strictly due to the type of water(s) I fish, but in the lakes the fly really shines for me.  I am not sure what the fish take it for, perhaps a leech, damsel or dragon fly nymph, but the tail and collar definitely provide enough undulating action that the takes are very hard!

The Casual Dress is suggestive of many aquatic food forms and only requires two materials tie- muskrat and ostrich herl.  Rosborough writes, "While is appears to represent some tidbit of very active food, to the fish, it really simulates nothing more than just that, food."

Tying notes:  (" " indicates direct quotes Rosborough's Tying and Fishing the Fuzzy Nymphs.

(1)  Although Rosborough doesn't specifically mention adding weight to his patterns, you may do so if desired.  He does mention "plenty of cement" (varnish) along the thread before the body is wound.  I usually weight the forward portion of the hook shank,
(2)  Even though the body is spun in a dubbing loop Polly pens, "It may look ragged enough as it is, but I score it anyways so the guard hairs are feathered out like centipede legs."  Rosborough used a hacksaw blade to score his fly bodies.
(3)  Just a personal preference, but I like a lot of guard hairs.  Especially when I tie the Casual Dress for lake fishing!
(4) I cannot tell you how many times I've read Rosborough book, but there's no reference to spinning the collar.  It does appear the fur from pelt was tied directly to the shank and then maneuvered around for 360-degree coverage.  If someone knows for sure please contact me.

Materials:

Hook:  2XL or 3XL hook.
Thread:  UTC 70, black
Tail:  Small clump of muskrat from the pelt.  Guard hairs left in place.
Body:  Muskrat. Body is formed by winding material in a dubbing loop.  Well picked out.
Collar:  Small clump of muskrat with guard hairs from the pelt spun in a dubbing loop.  
Head:  Ostrich, dyed black.  

Casual Dress Fly, Polly Rosborough, Muskrat Patterns, Fuzzy Nymphs

Saturday, August 29, 2015

Fugly Bugger

2 comments:
I am hoping I don't have to explain the slang terminology of the first word in this pattern's name.  It is not pretty (pun intended). However, beauty is in the eye of the beholder!

You've probably notice a few changes from a standard woolly bugger- the peacock herl tail and dubbed body.  It was a result of creative fly tying juices flowing, yet I won't claim any originality of the pattern.  The whole premise of this step-by-step is to get the tier thinking more outside the "material box."  

My preference for bugger bodies has always been dubbing.  While adding a little time to pattern completion, a dubbed body creates a very buggy appearance, bulk (if desired), movement that chenille(s) cannot compete against, and the extra attraction of it's unique light refraction/signature- especially when synthetic materials are utilized.  However, don't limit yourself...  Natural hair, (or a mix of natural and synthetic) e.g., angora, opossum, squirrel, picked out work wonders at times!  

This step-by-step utilizes a synthetic spectrumized peacock colored dubbing.   Mr. Peacock dubbing from The Fly Tyers Dungeon (www.flytyersdungeon.com)(no affiliation) is very inexpensive and available in 12 wickedly vibrant fishy colors.  I classify this material as semi-coarse and easy to dub.

Peacock herl for a tail?  Peacock herl taken from under the eye possesses the most vivid, longest fibers off the stem and wonderful movement in the water.  However, many consider it a little too weak for tailing material. Understandable, but the strength and magic of peacock is often underestimated. Chewed or broken herl can always be discreetly cut back to the body and the fly can then be fished as a Woolly Worm-ish pattern.  Further trimming of the hackle results in a cased caddis.  A suitable substitution is thin peacock sword.

Although not aesthetically pleasing in the eyes of most, other tailing materials include single strand floss, Angel Hair (or eqvuilant), metallic threads, and longer supple hair such as temple dog and arctic fox under fur.  You are only limited by your imagination!   The fuglier - the better!

Materials

Thread: 10/0 Veevus, black or choice
Hook:  Daiichi 1260 size 6 (shown) or choice
Bead:  Spirit River Brite Bead, 4.0mm, nickel black (shown) or choice
Weight to suit
Tail:  6 to 10 peacock herls taken from below the eye
Rib: Optional 
Hackle:  Black strung saddle
Body:  Mr. Peacock dubbing (synthetic peacock color)

Step 1

Slid bead on to hook.  Secure hook in vise.  Additional weight may be added at this point.  I have elected to slightly increase the weight and fill the void of bead with UTC wire as pictured.

Take 5 or 6 wraps of wire forward over the shank.


Once the number of wraps are complete, double back.  Remove tag ends and push wire into the center of the bead.

Step 2

Start thread immediately behind bead and wind rearward stopping between the hook point and barb.

Step 3

Remove 6 to 10 peacock herls from under the eye. (Six are pictured.) Align tips. I prefer bugger tails slightly shorter than normal and have measured just short of one hook length.  Secure herl with forward wraps of thread.

Step 4

Return thread to the rear of the hook.

The ribbing is optional and can be tied in during this step.  I have elected to bypass the ribbing. The body will be dubbed loose enough for me to bury the hackle stem firmly in to the material.

Select a saddle hackle with fibers slightly longer than one gape length.  Prepare by stripping one side free of fibers.  Secure tip first to hook.

Step 5

Wax thread.  Remove a small amount of dubbing from packaging.  

Loosely apply/twist a small amount of dubbing. Appearance should look similar to the picture.  

Wind forward to the bead.  Note the shaggy appearance.

Step 6

Lift hackle straight up.  Ensure fibers are pointed rearwards. Wrap hackle forward in 5 or 6 increments.  Take 2 or 3 extra wraps behind the bead.  Remove tag end.  Secure with two whip finishes if ribbing was omitted.

If rib was utilized, counter-wrap over the hackle stem.  Secure, remove tag end, and whip finish.

Step 7

The fly could easily be fish at this point.  However, I like these patterns shaggy!  Since the ribbing was omitted, I recommend a bodkin to carefully pick out the body material between the hackle wraps. A velcro or a bore cleaner may break the steam if too much pressure is applied.

Finished!

A quick side bar...  Even though the body has been heavily picked out note how thin the body still appears. Additionally, keep those tails thin.  A thinly dressed fly catches more fish!

Finally, one fishing technique I often use on the river is using a heavily weight Fugly Bugger (or any bugger) as a point fly in combination with a soft hackle or emerger patten.  The cast is made three quarters upstream and worked to completion downstream. The strike can come at anytime, but normally it occurs as the flies near the end of the drift and begin to rise off the bottom.

Enjoy!